
Getting started
From sign-up to your first closed-out night – the whole path, in order.
- What TableTurn is, in one minute
- The setup checklist – six steps to your first sale
- Step 1 – Create your restaurant
- Step 2 – Pick your plan
- Step 3 – Set your basics
- Step 4 – Install it like a real POS
- Step 5 – Build enough menu to sell
- Step 6 – Ring your first sale (cash)
- Step 7 – Turn on card payments
- Step 8 – Your first card sale, and the tip
- Step 9 – Close out the night
- Counter service or table service – which are you?
- The rest of the system, and where to read about it
What TableTurn is, in one minute
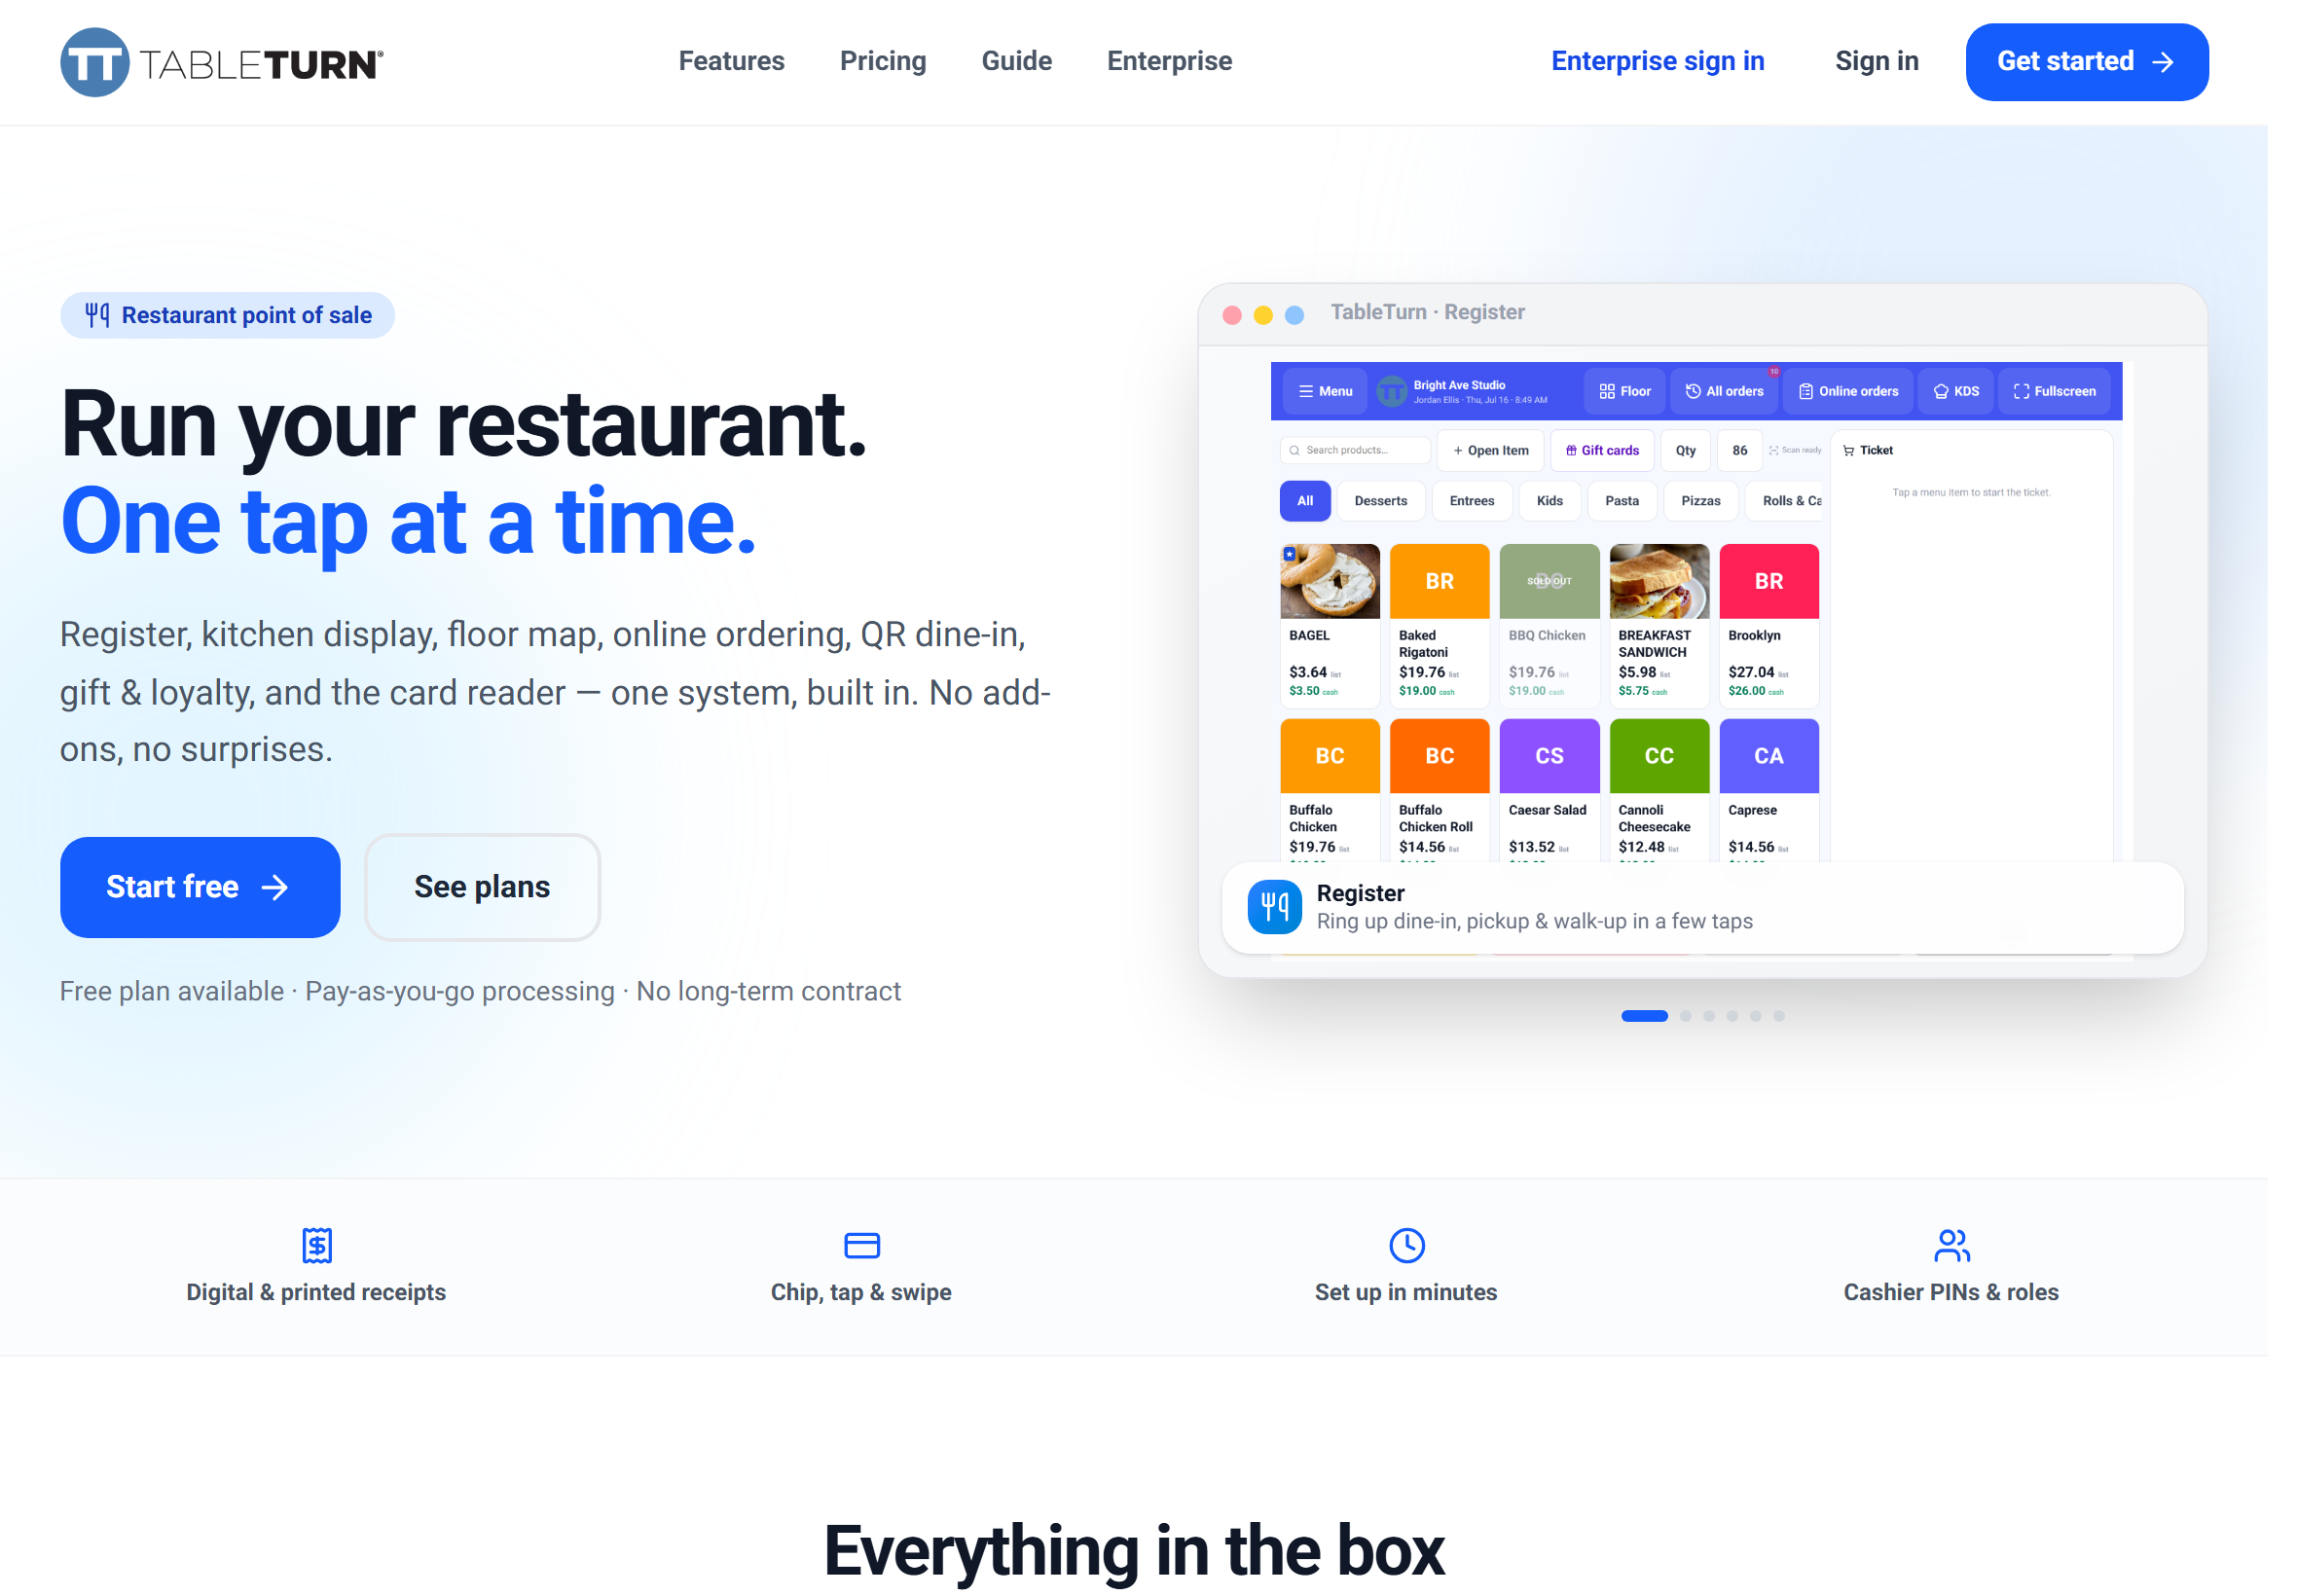
TableTurn is a restaurant point of sale that runs in a browser. There is nothing to install and no back-office server – you sign in on an iPad, a laptop, or a phone, and the register is there.
It handles both halves of a restaurant. Counter service (QSR) is ring-and-pay: order, take money, done. Table service adds a floor plan, seats, courses, and a check that stays open while guests eat. The same account does both, and the same menu feeds both – you're not running two systems.
Around the register sit the parts that make it a whole operation: a kitchen display and printers, online ordering and QR codes for the table, staff PINs and permissions, tips and payouts, and end-of-night reporting.
Read this chapter start to finish once. Every other chapter goes deep on one piece; this one is the map.
The setup checklist – six steps to your first sale
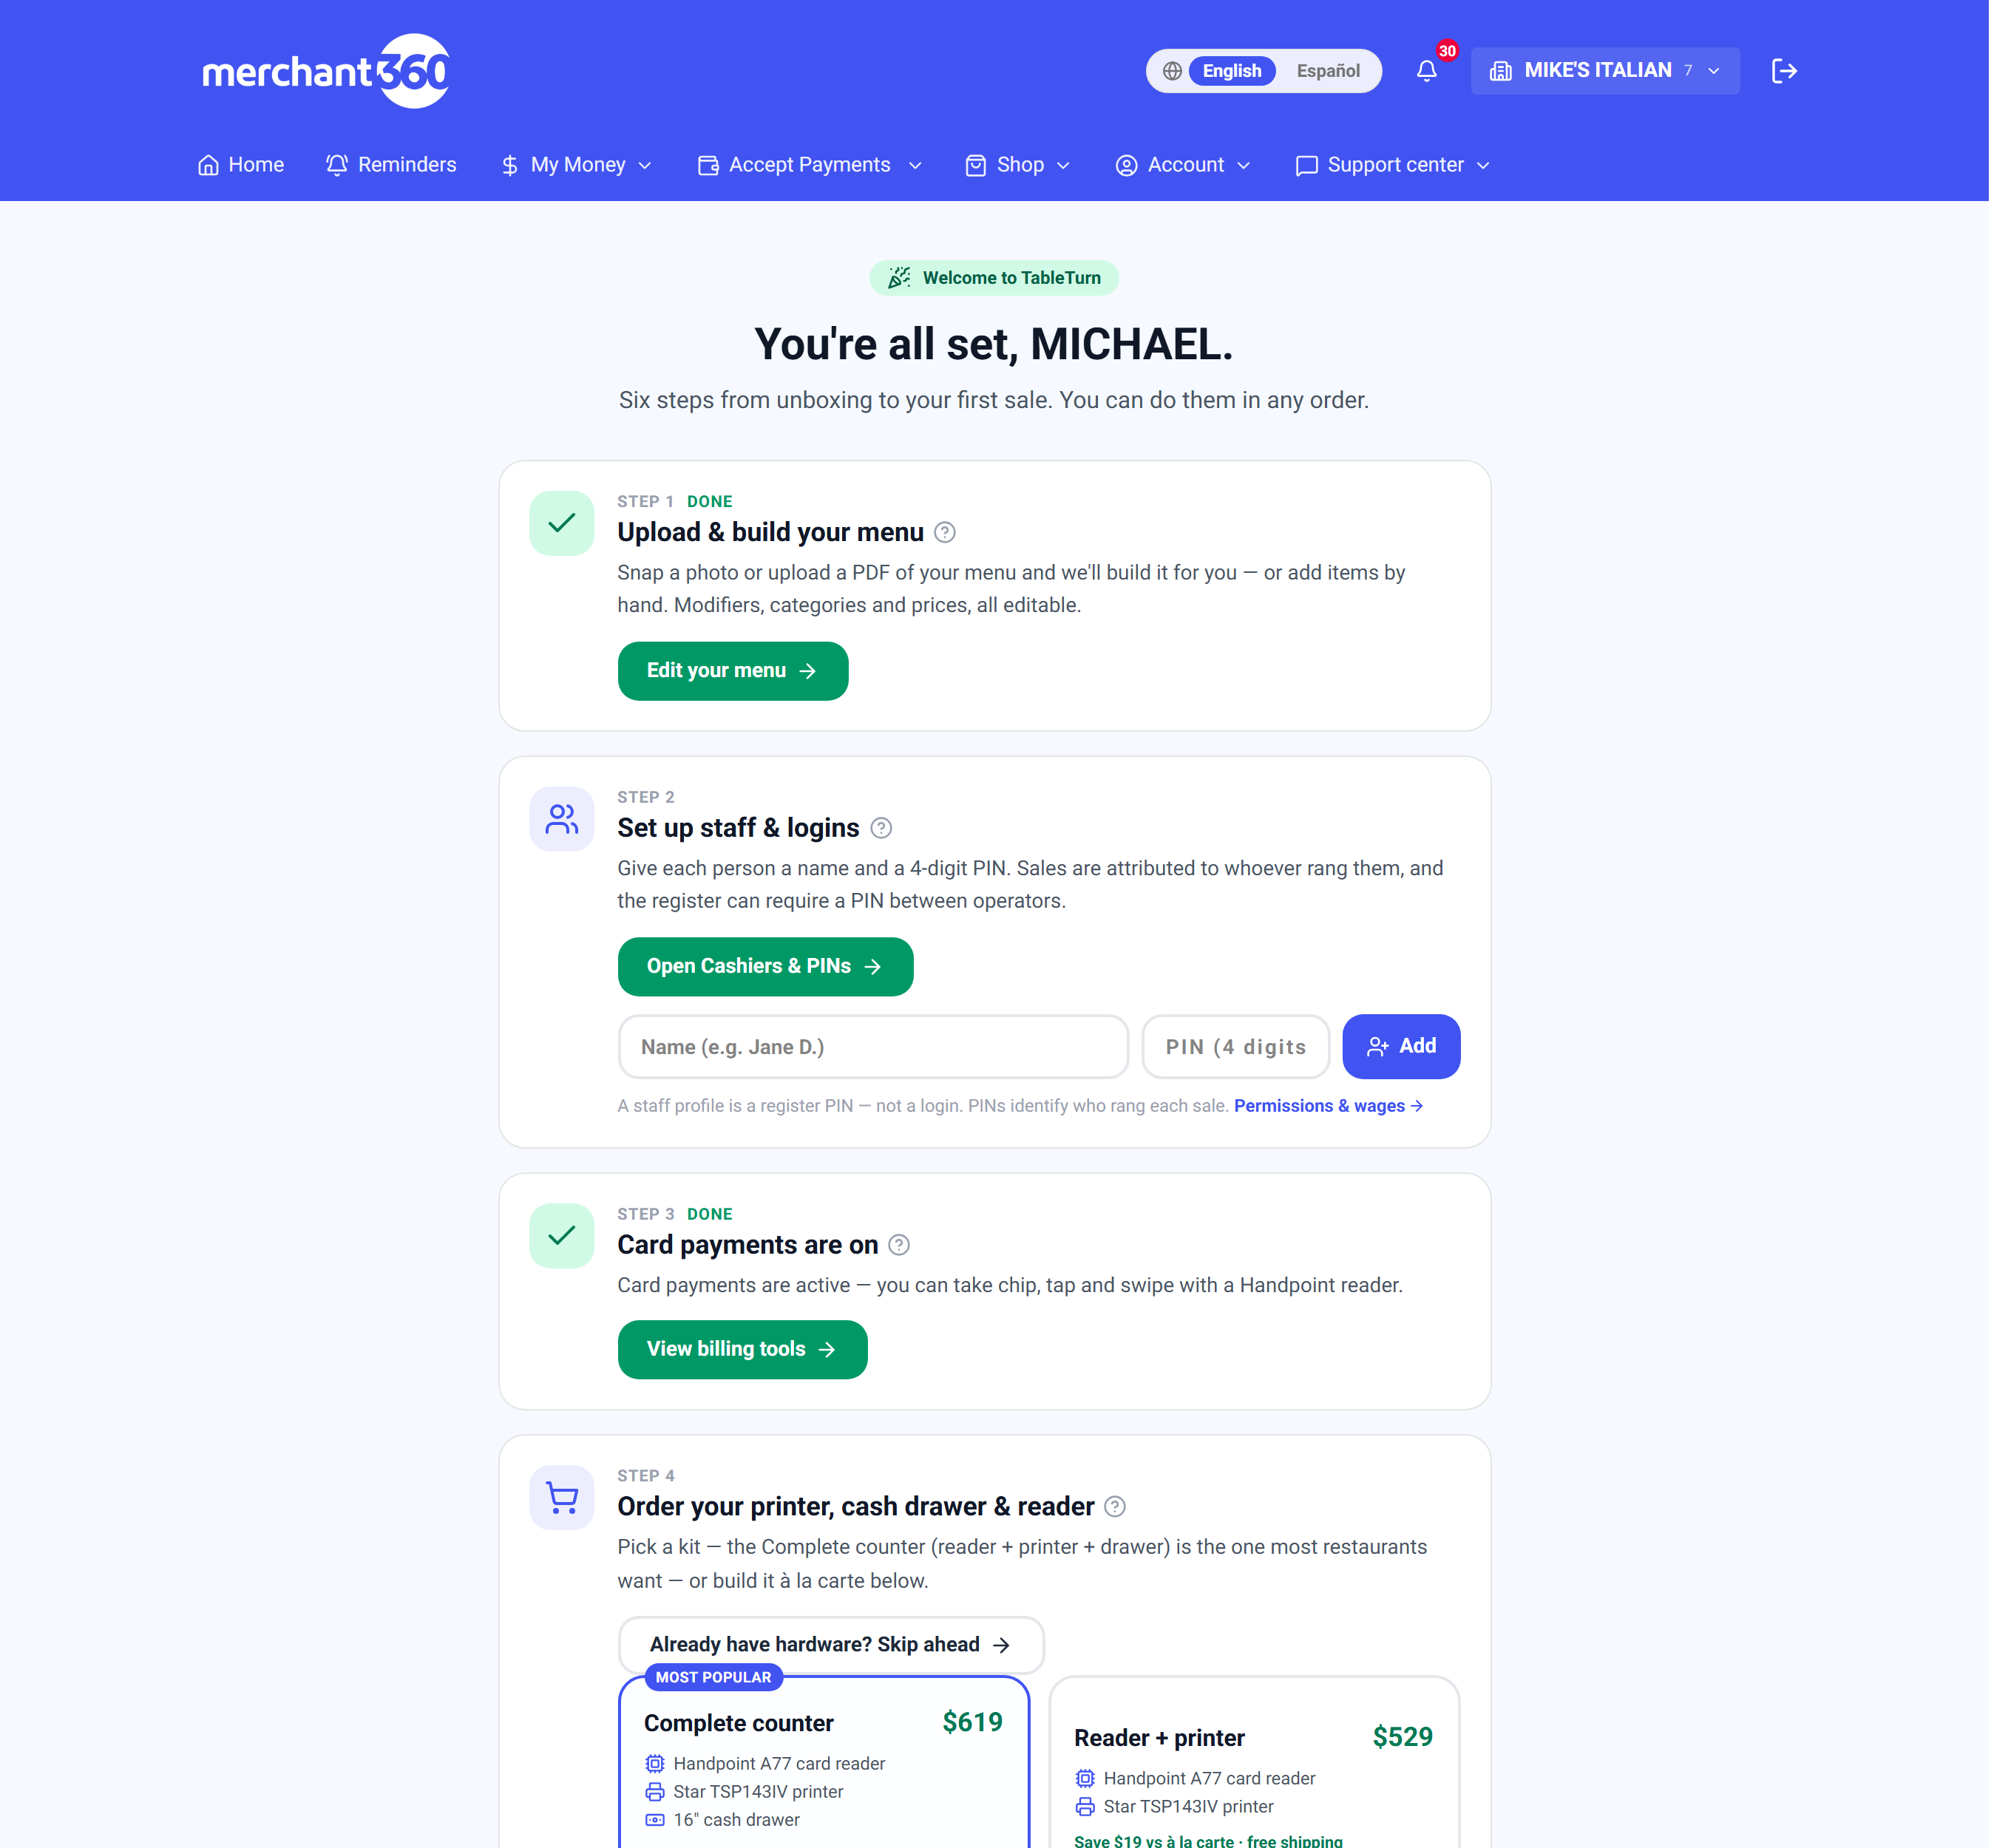
After sign-up, TableTurn opens on a six-step checklist that takes you from unboxing to your first rung sale. Each step shows a green DONE check as you complete it, and you can do them in any order. It's always waiting under Setup & welcome steps in the register menu if you leave and come back.
1 – Upload & build your menu. Snap a photo or upload a PDF of your menu and TableTurn builds it for you – items, prices, categories, even modifier groups – all editable afterward. Or add items by hand.
2 – Set up staff & logins. Give each person a name and a 4-digit PIN, right on the checklist. Sales are attributed to whoever rang them.
3 – Set up payments. When card payments are active you'll see it confirmed here; otherwise the step walks you through it.
4 – Order your printer, cash drawer & reader. Pick a kit – the Complete counter (reader + printer + drawer) is the one most restaurants want – or build it à la carte. Kit printers arrive preconfigured for your account. Already have hardware? Skip ahead.
5 – Hook up and test your printer. The printer wizard finds your printer and sends a test ticket (more in the Receipts chapter).
6 – Start ringing sales. The checklist confirms your first sale and you're live.
Step 1 – Create your restaurant
- 1Go to tableturn.cloud and tap Sign up.
- 2Enter your business name, email, and a password. That is the entire form.
- 3You land in your workspace immediately – no waiting on approval, no sales call.
- 4Log in any time at tableturn.cloud with the same email and password.
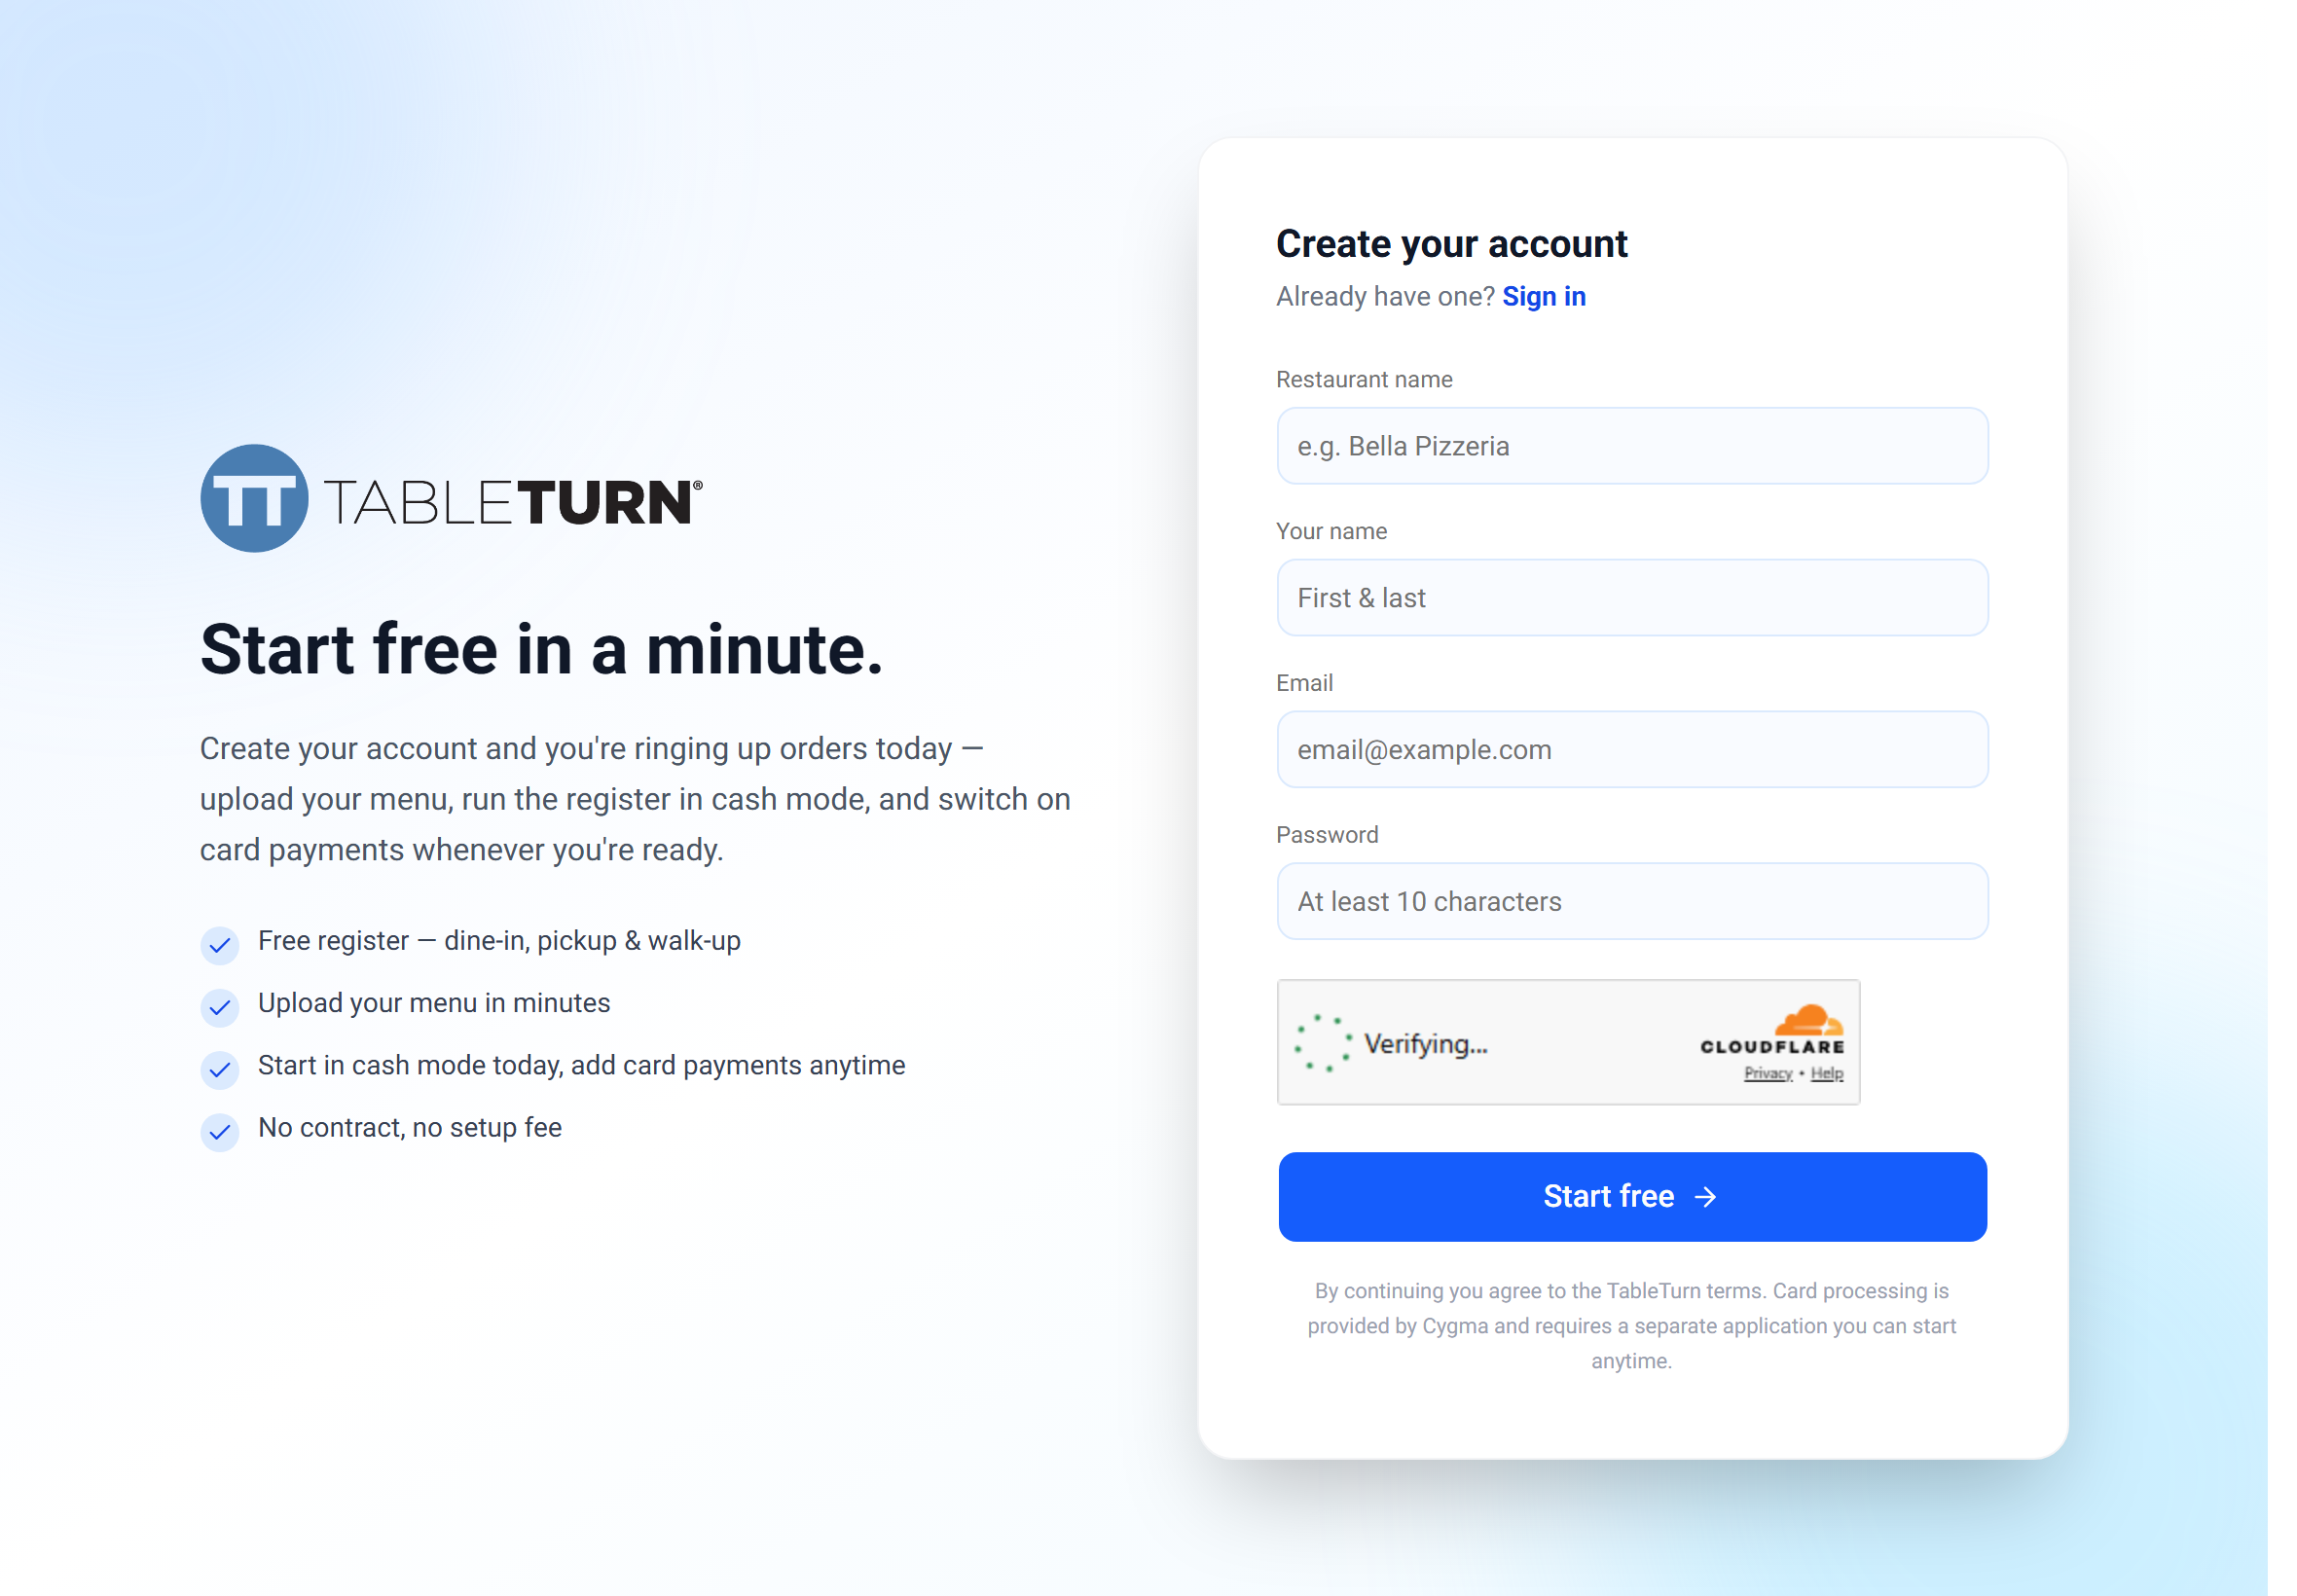
Your account starts on TableTurn Lite, free, in **cash mode**. Every register feature works before card processing exists, so you can ring real cash sales on day one and set up cards later.
Step 2 – Pick your plan
Lite is free and complete for counter service: the full register, kitchen display and printing, menu builder, staff PINs, and reporting.
Lite+ adds full Table Service – the floor plan, seats and coursing, and the floor designer – for a flat monthly fee.
Pro is the full-service flagship for busy dining rooms, with everything above plus the deeper table-management and reporting tools described throughout this guide.
Change plans whenever you like under TableTurn plan & billing. Changes prorate, so switching mid-month doesn't cost you a month.
Not sure? Start on Lite. If you find yourself wishing the register knew which table an order belongs to, that is the moment to move to Lite+ or Pro.
Step 3 – Set your basics
- 1Open Settings and enter your restaurant's name, address, and phone – these print on receipts and appear on your online ordering page.
- 2Set your tax rate. Get this right before you ring anything; it is the one setting that quietly changes every total.
- 3Choose your service style: counter service, table service, or both. This decides whether the register opens straight into a cart or onto a floor plan.
- 4Set your tipping style – on-screen presets, prompt on the card reader, or adjust-after (the restaurant standard, where the server enters the tip from the slip). See the Payments chapter; the three are genuinely different workflows.
- 5Upload your logo if you have one. It lands on receipts, guest checks, and your ordering page.
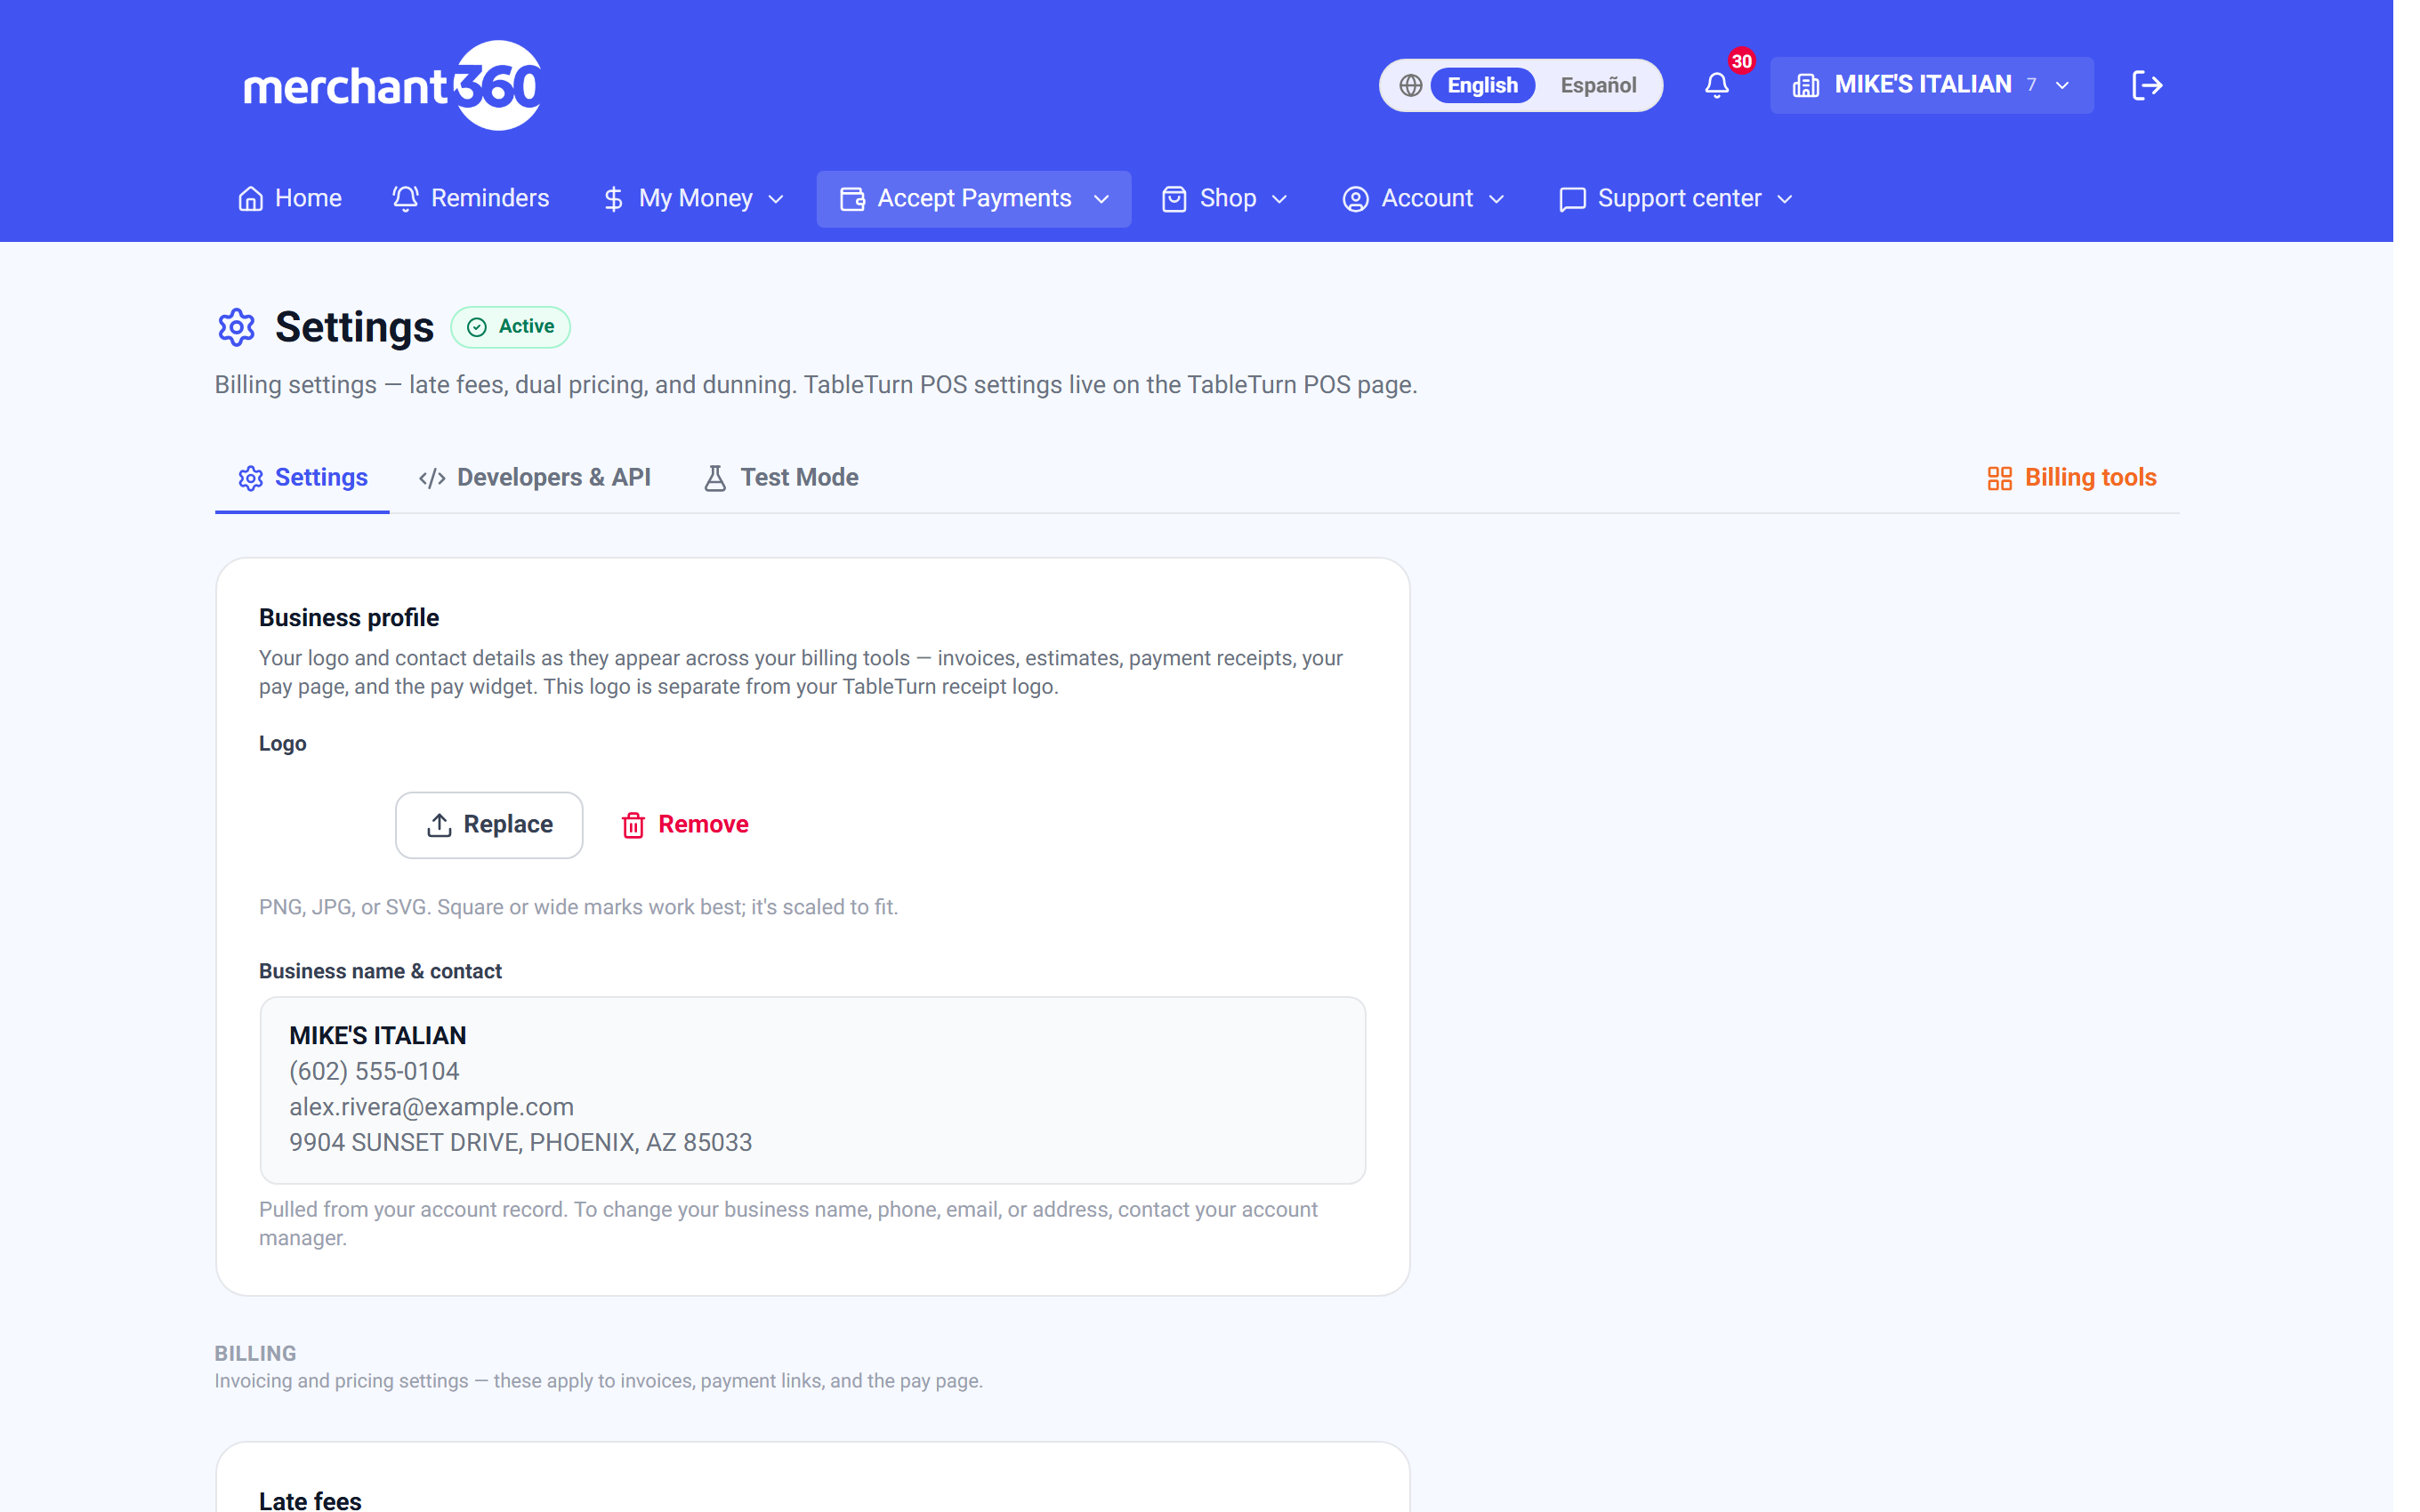
Tax and tipping style are the two settings worth pausing on. Everything else you can change later without touching past sales.
Step 4 – Install it like a real POS
TableTurn runs in a browser, but it shouldn't *look* like one on your counter. Installing it to the home screen removes the address bar and launches it full-screen, so staff see a POS and not a web page.
- 1iPad / iPhone: open tableturn.cloud in Safari, tap Share → Add to Home Screen, name it, and tap Add.
- 2Android: the easiest path is the real app – search TableTurn on the Google Play Store and install it like any other app. Or, from Chrome, tap the ⋮ menu, then Install app / Add to Home screen.
- 3Laptop / desktop: Chrome and Edge show an install icon in the address bar. Click it for a windowed app with no browser chrome.
- 4Launch from the new icon from then on. Log in once and the device stays signed in.
Do this on every device before your first shift. A tablet still showing browser tabs is the fastest way for someone to navigate away mid-order.
Step 5 – Build enough menu to sell
You do not need a finished menu to start. You need a few things you actually sell, and you can grow it between rushes.
- 1Open the Menu builder and create a category – Drinks, Apps, Entrées, whatever matches how your staff think.
- 2Add items with a name and price. Drop them into the category.
- 3Add modifiers where a guest gets a choice – temperature, sides, milk, size. Mark which are required so the register asks rather than hoping the server remembers.
- 4Reorder by dragging. The register mirrors this layout exactly, so arrange it the way your hands will move.
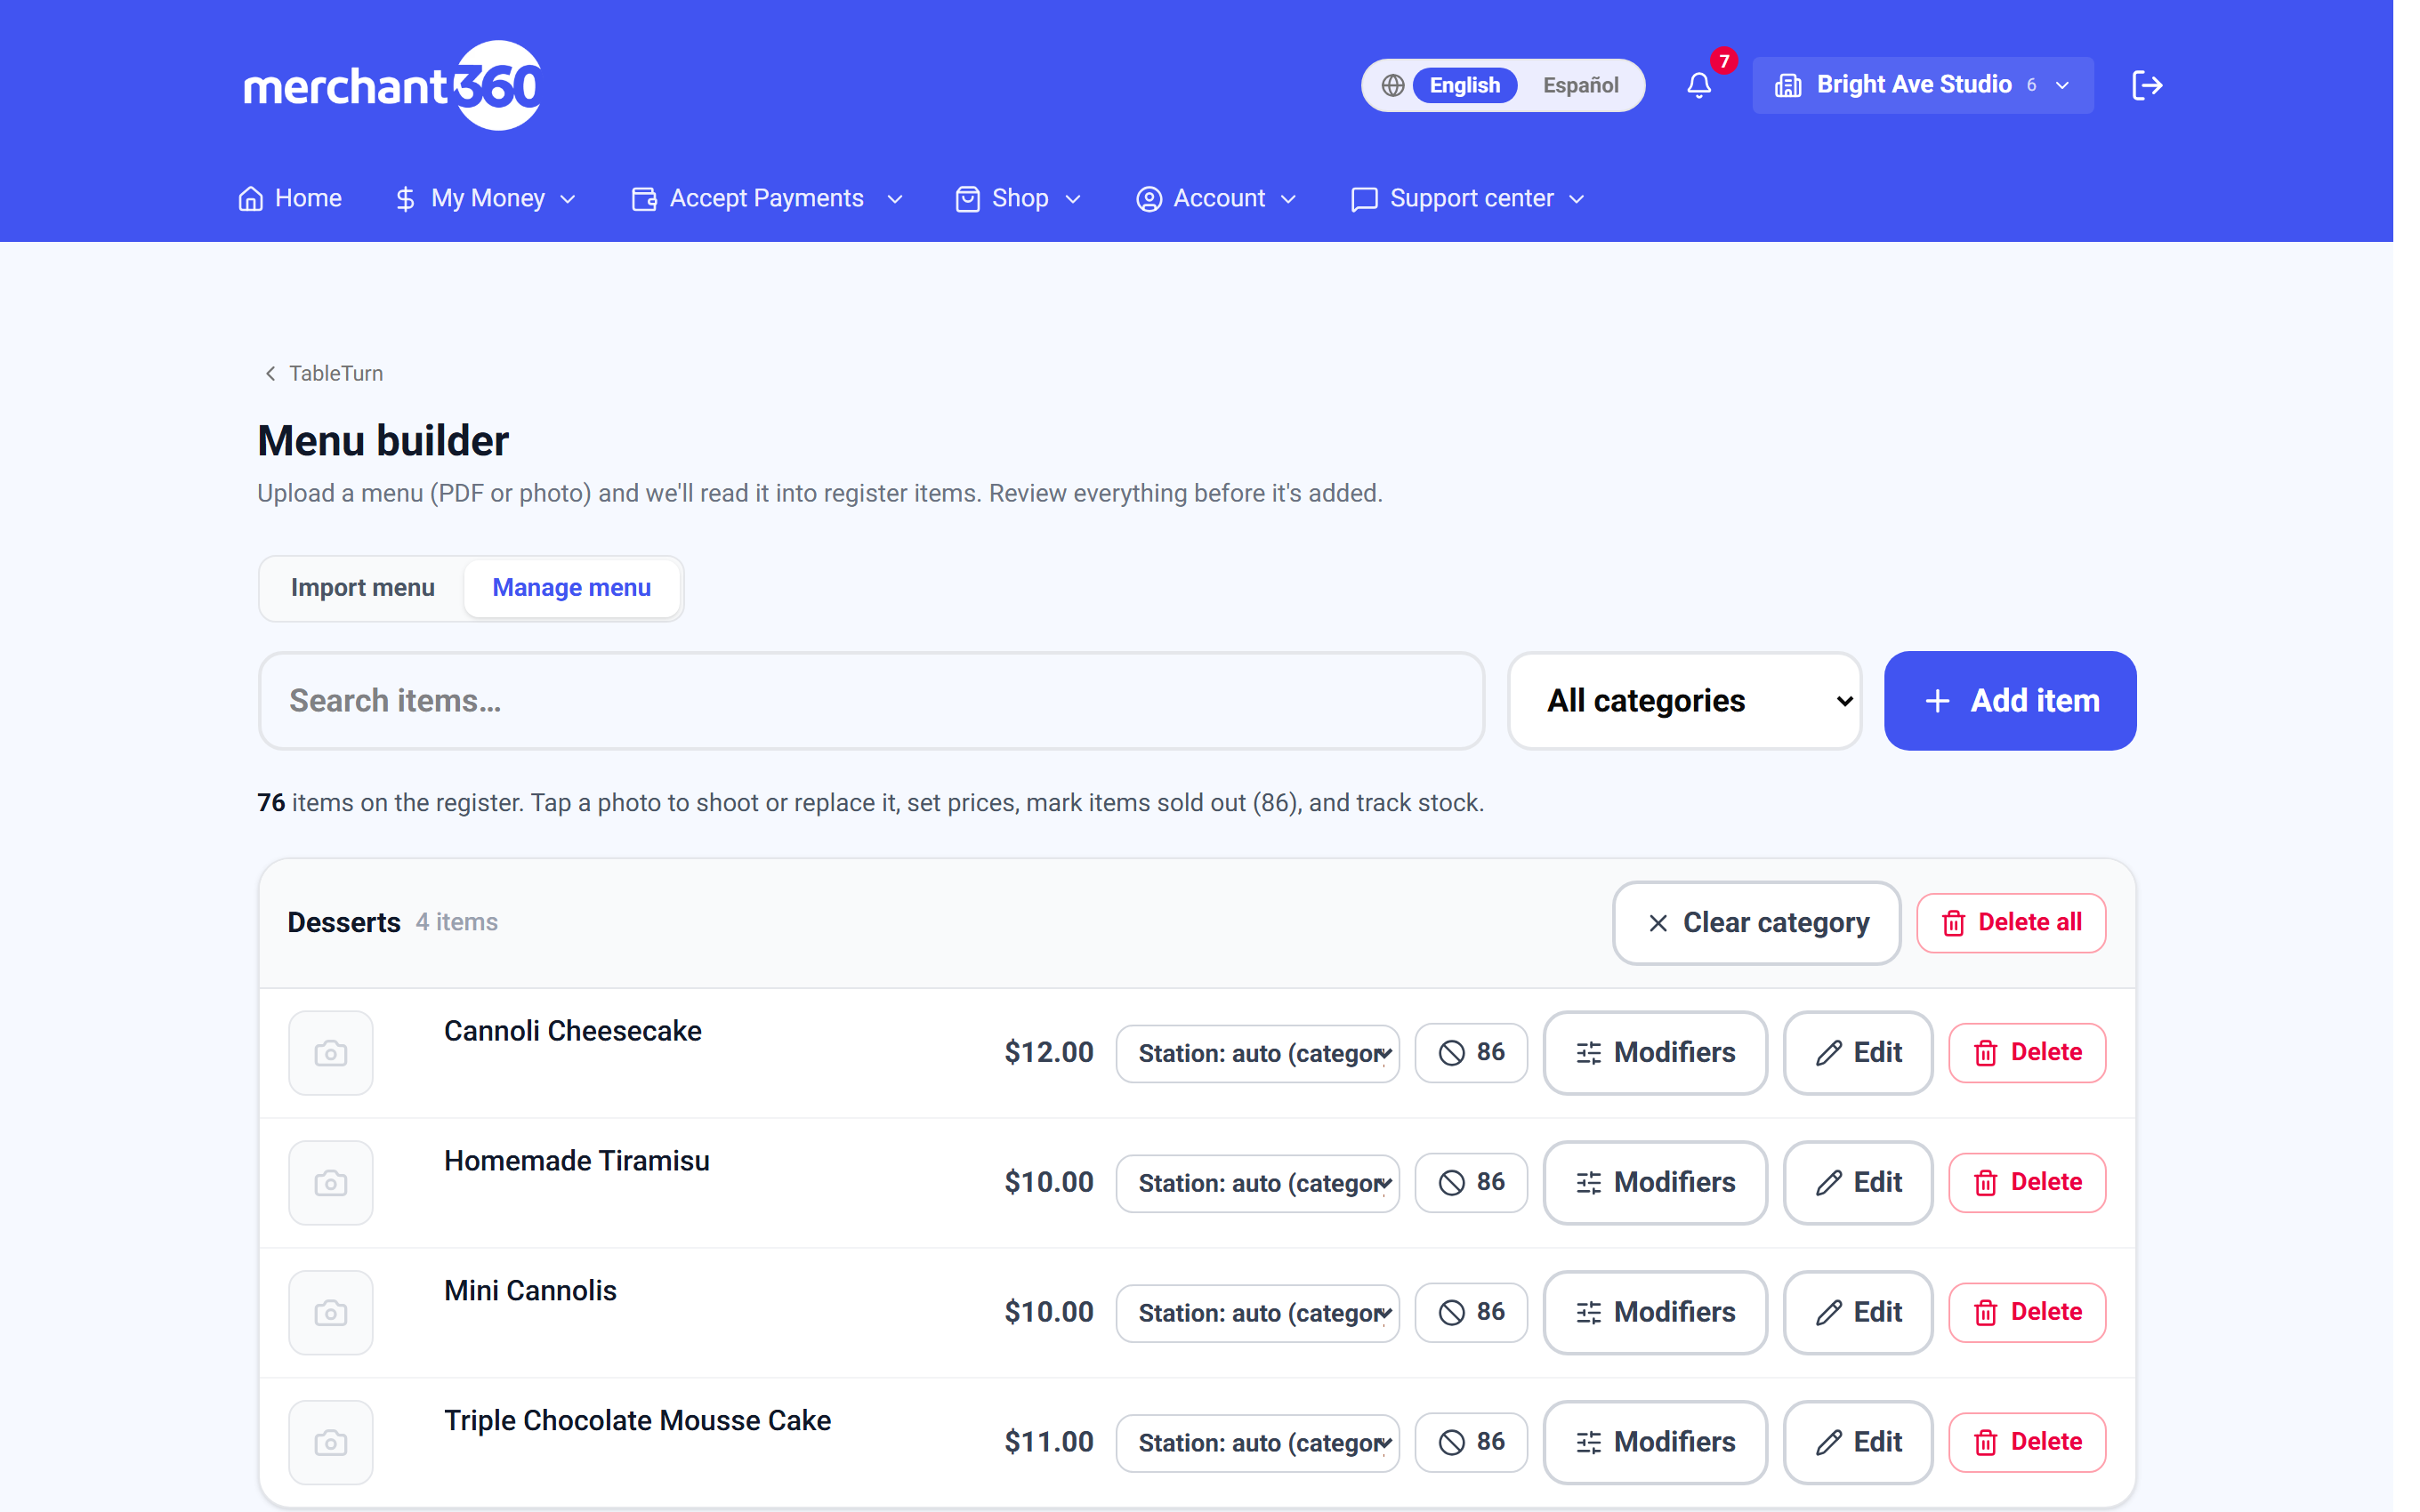
Short on time? Skip the menu entirely for now – the register's **Open Item** button rings any amount you type. Plenty of restaurants open on open items and build the menu in week one.
Step 6 – Ring your first sale (cash)
- 1Open the Register.
- 2Tap items to add them. Tap a line in the cart to change quantity, add a note, or remove it.
- 3Tap Pay.
- 4Choose Cash, enter what the guest handed you, and TableTurn shows the change to give back.
- 5The sale closes, the receipt prints or emails, and the drawer kicks if you have one attached.
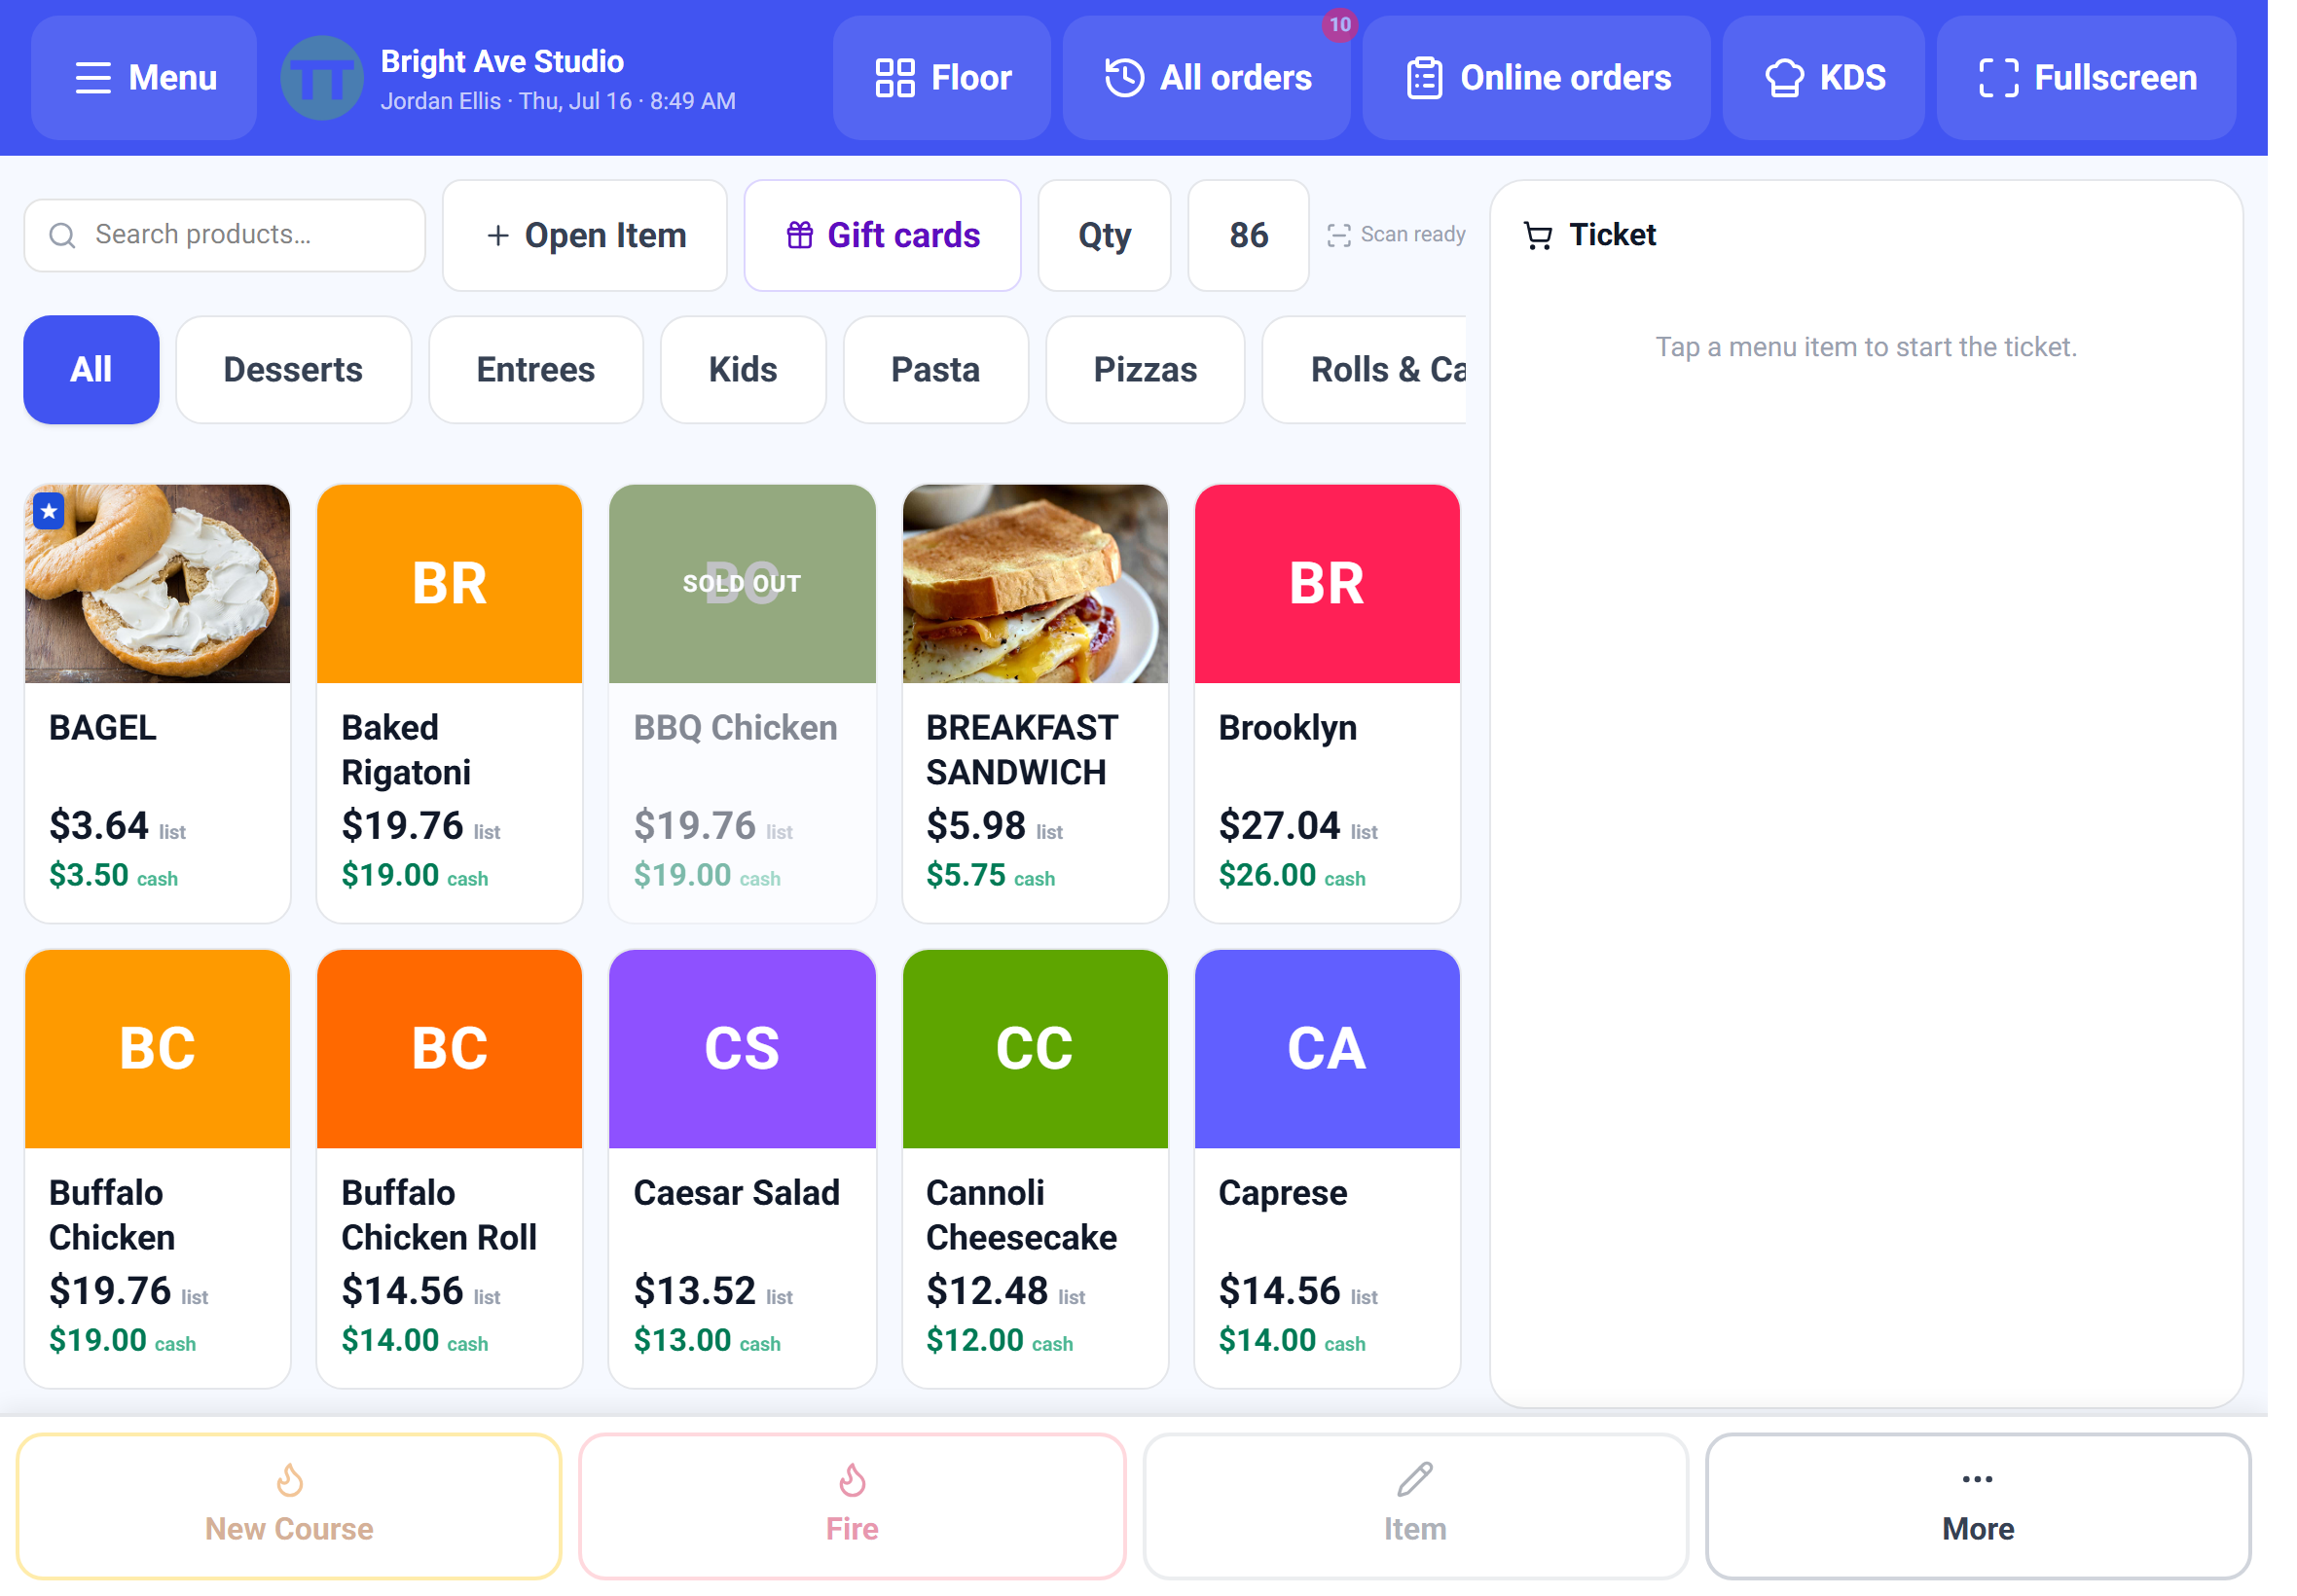
Ring a $1 test sale and refund it before your first real shift. It proves the whole path – register, receipt, printer, report – in about thirty seconds.
Step 7 – Turn on card payments
When you're ready for cards, apply for processing inside TableTurn. The application is short, most of it verifies automatically, and you sign electronically.
Once approved, your card reader ships, your pricing activates, and the Charge button lights up at the register. Nothing about your menu, staff, or past sales changes – cash mode simply stops being the only option.
- 1Open Settings → Payments and start the application.
- 2Have your business details, bank account, and ownership information ready – that's most of the form.
- 3Sign electronically and submit.
- 4When the reader arrives, pair it (see the Devices chapter), then run a small live sale and refund it to confirm the whole path.
Deciding on **dual pricing** – showing a cash price and a card price – is easiest before you launch, because it changes how every tile and receipt reads. The Payments chapter covers it.
Step 8 – Your first card sale, and the tip
A card sale rings the same way; only the tender differs. What happens with the tip depends on the style you chose in Step 3, and this is where most new operators get surprised.
- 1Ring the order and tap Pay → Card.
- 2On-screen tips: the register (or customer display) shows tip presets before the charge runs.
- 3On-reader tips: the card machine asks the guest directly.
- 4Adjust-after: the card runs for the check amount with no tip prompt. The guest writes a tip on the slip, and a server enters it afterwards from All Orders. The sale sits in a Needs tip queue until someone does.
In adjust-after mode the register will not let you close out with tips outstanding – it sends you to the queue instead. That is the difference between a clean Z-report and a night spent chasing paper slips.
Step 9 – Close out the night
- 1Enter any outstanding tips – the top bar badges how many are waiting.
- 2Run the Z report (End of day). It totals sales, tax, tips, discounts, and each tender, and closes the day's books.
- 3Count the drawer against the cash line and record the difference.
- 4Card batches settle automatically; you do not need to send anything.
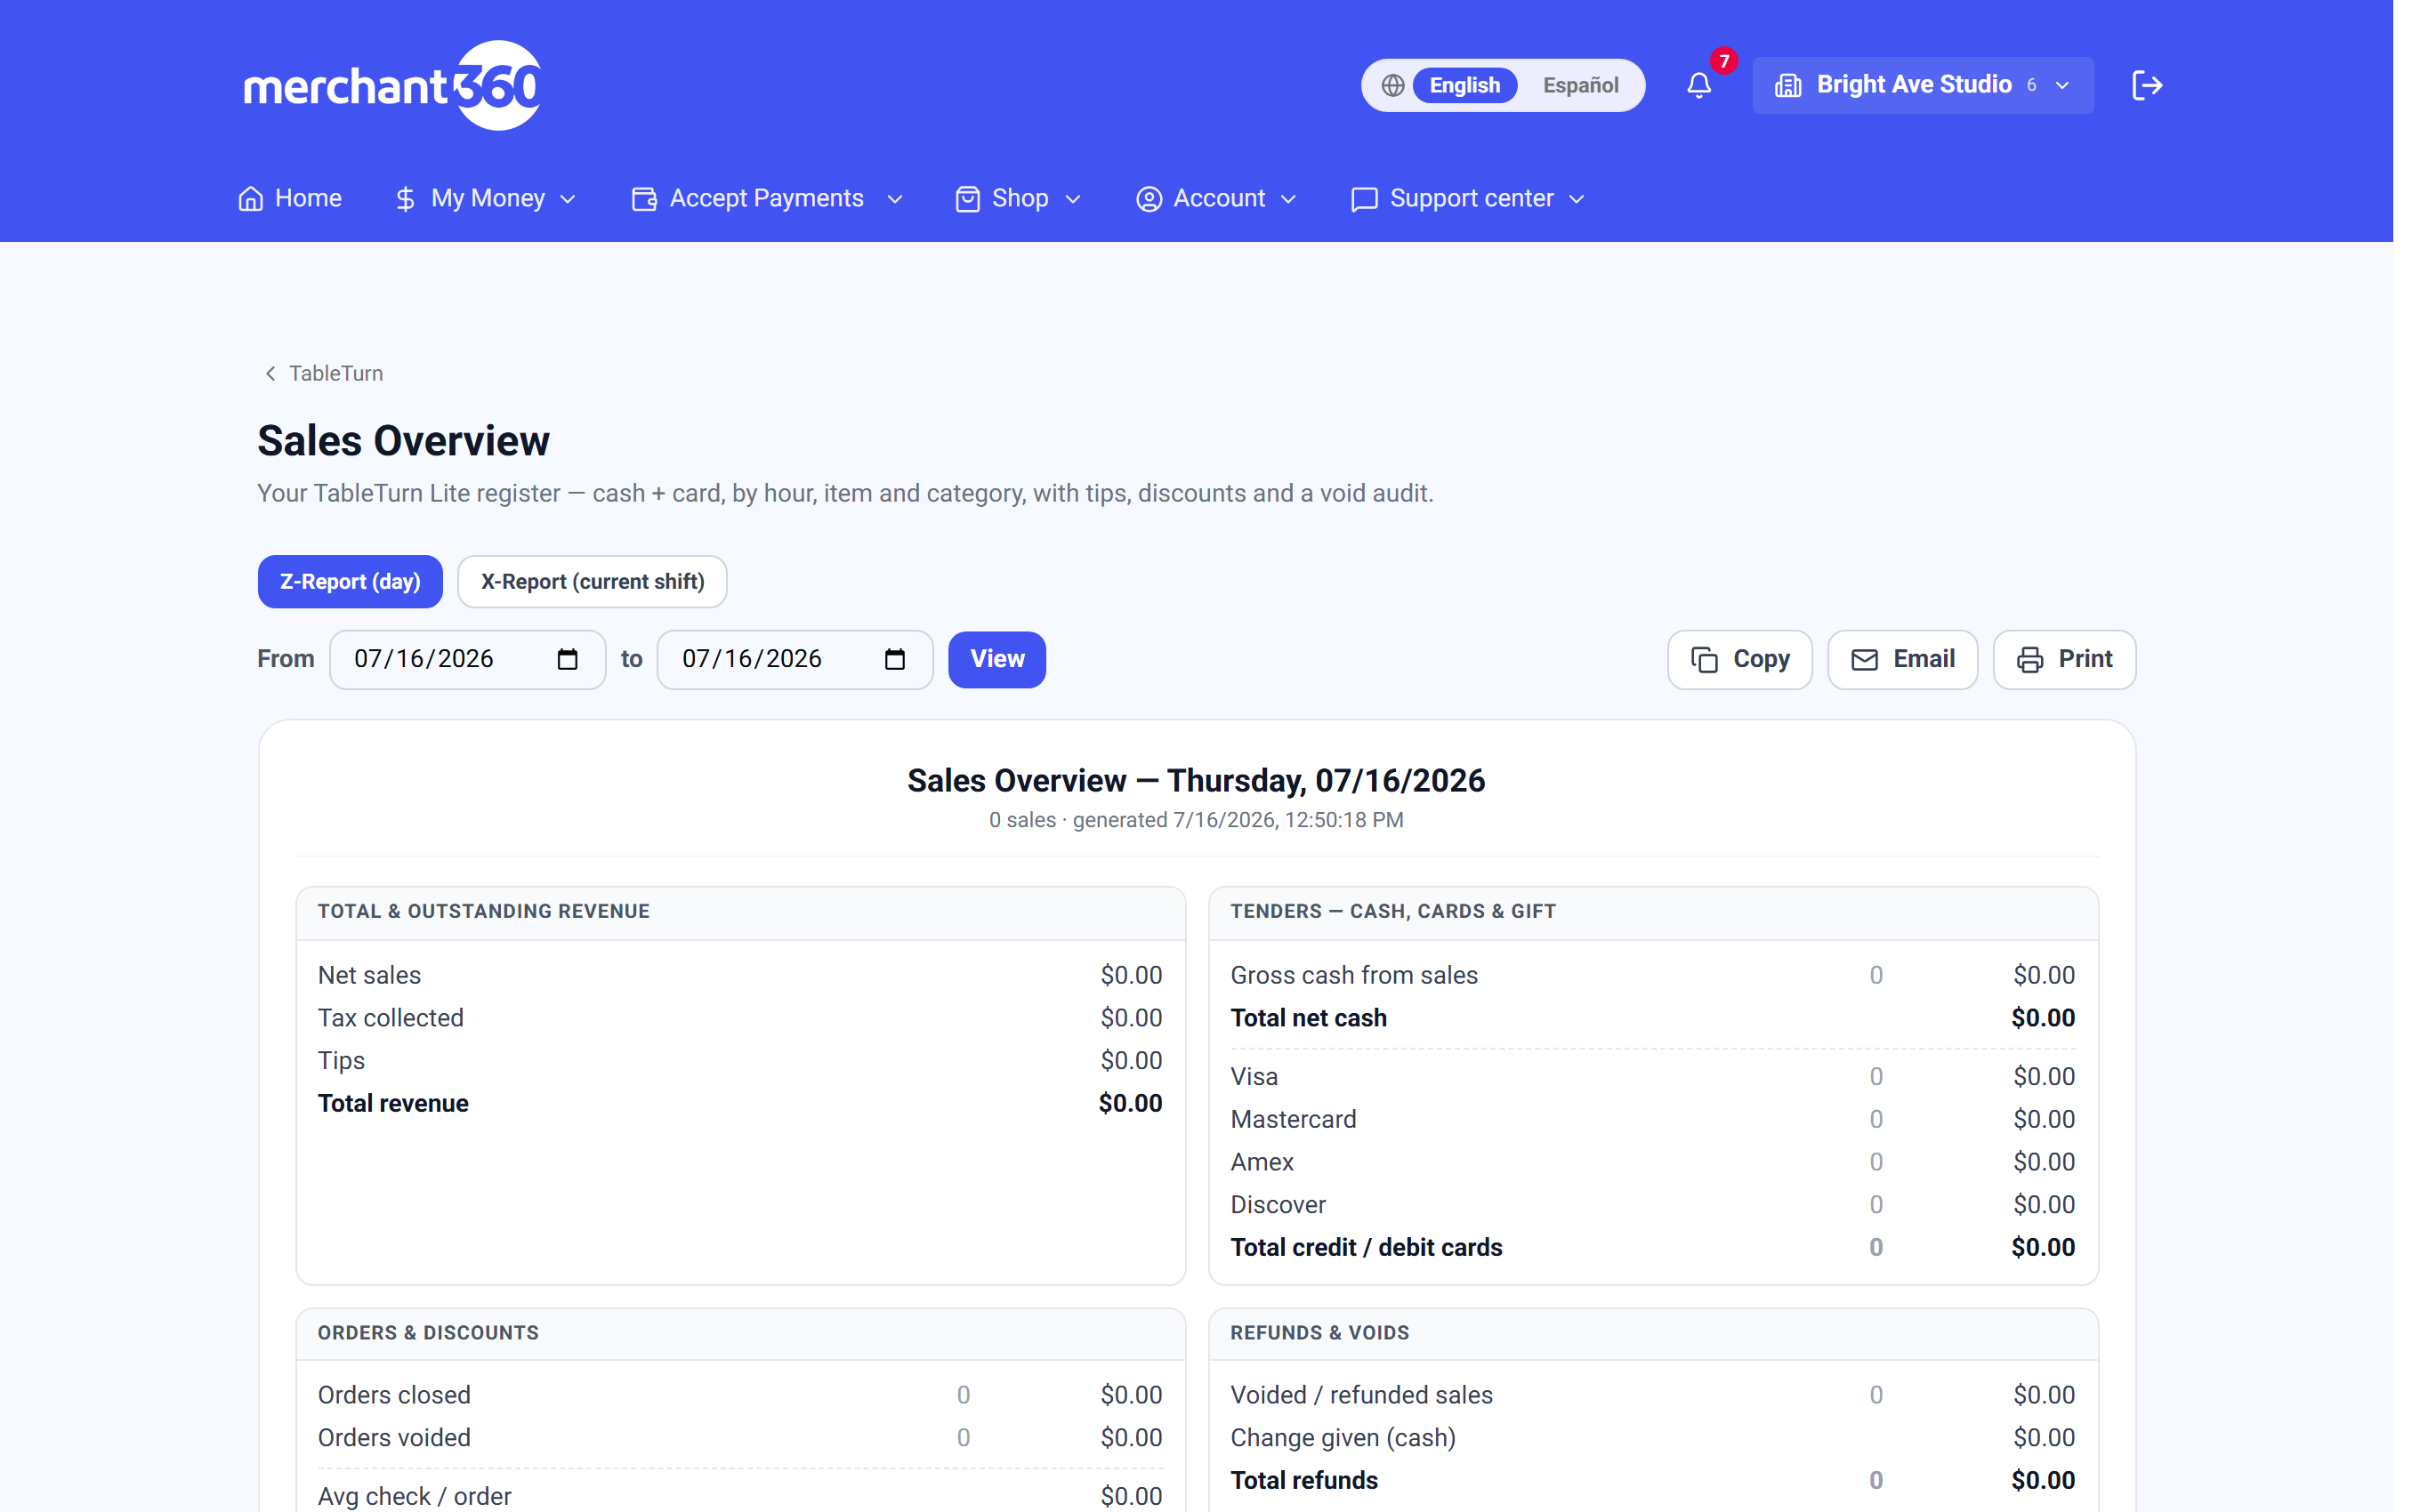
Run the Z report at the same point every night. It is the record you'll reach for when a number looks wrong three weeks later.
Counter service or table service – which are you?
Counter service (QSR) is one screen: ring, pay, next guest. Orders go to the kitchen the moment they're paid. Cafés, bars, takeaway, food trucks.
Table service starts on a floor plan. You open a table, send courses as guests order, the check stays open through the meal, and payment happens at the end – with splitting by seat, by item, or evenly.
You can run both. A dining room with a takeaway counter uses table service on the floor and the counter register at the till, off one menu and one set of reports.
The Register chapter covers counter service; Table service has its own chapter. Read the one that matches your room first, then skim the other – most restaurants end up using both.
The rest of the system, and where to read about it
Menu builder – categories, modifiers, 86ing items, and price changes that reach every screen at once.
Floor plan & tables – draw your room, then read it at a glance: which tables are seated, waiting, or ready to turn.
Kitchen: KDS & printers – put orders on a screen or on paper, routed by station so the grill doesn't get the dessert tickets.
Payments, tips & pricing – every tender, all three tip styles, dual pricing, splitting checks, discounts and comps.
Online ordering & QR – your own ordering page, and QR codes that let guests order or pay from the table.
Staff & permissions – PINs, roles, and who is allowed to comp, refund, or open the drawer.
Reports – sales by hour, item, and server; tips owed; and the Z report.
Devices – readers, printers, cash drawers, and the customer display.
Table Time – the timing view that shows how long each table has been sitting at each stage.
Troubleshooting – printer silent, reader not pairing, a sale that looks wrong.
Everything in this guide is searchable. If you're mid-shift and stuck, search the thing you're looking at – "split", "86", "refund", "tip" – rather than hunting for the right chapter.