
Menu builder
Items, photos, prices, modifiers, and schedules.
- Where the menu lives, and what it feeds
- Import a menu you already have
- Menus that list two prices
- Adding and editing items by hand
- The item editor, field by field
- Stock tracking and 86
- Categories
- Modifier groups
- Build a group once, use it everywhere
- Follow-up questions that only appear when they're needed
- Quick prefixes for special instructions
- Allergens
- Special tags
- Menu schedule – showing the right menu at the right time
- Favorites pages
- Sending items to the right kitchen station
- How changes reach the register
Where the menu lives, and what it feeds
One menu drives everything. What you build here becomes the register's tiles, your online ordering page, the kitchen tickets, and the item lines on every report. There is no second menu to keep in step.
Open it from Menu – items, prices & photos in the register's top-bar Menu, or from your back office. It has two tabs: Import menu, for reading an existing menu off a PDF or a photo, and Manage menu, where you actually work.
Nothing here needs to be finished before you sell. A handful of real items is enough to open; the rest can grow between rushes.
Adding and editing items by hand
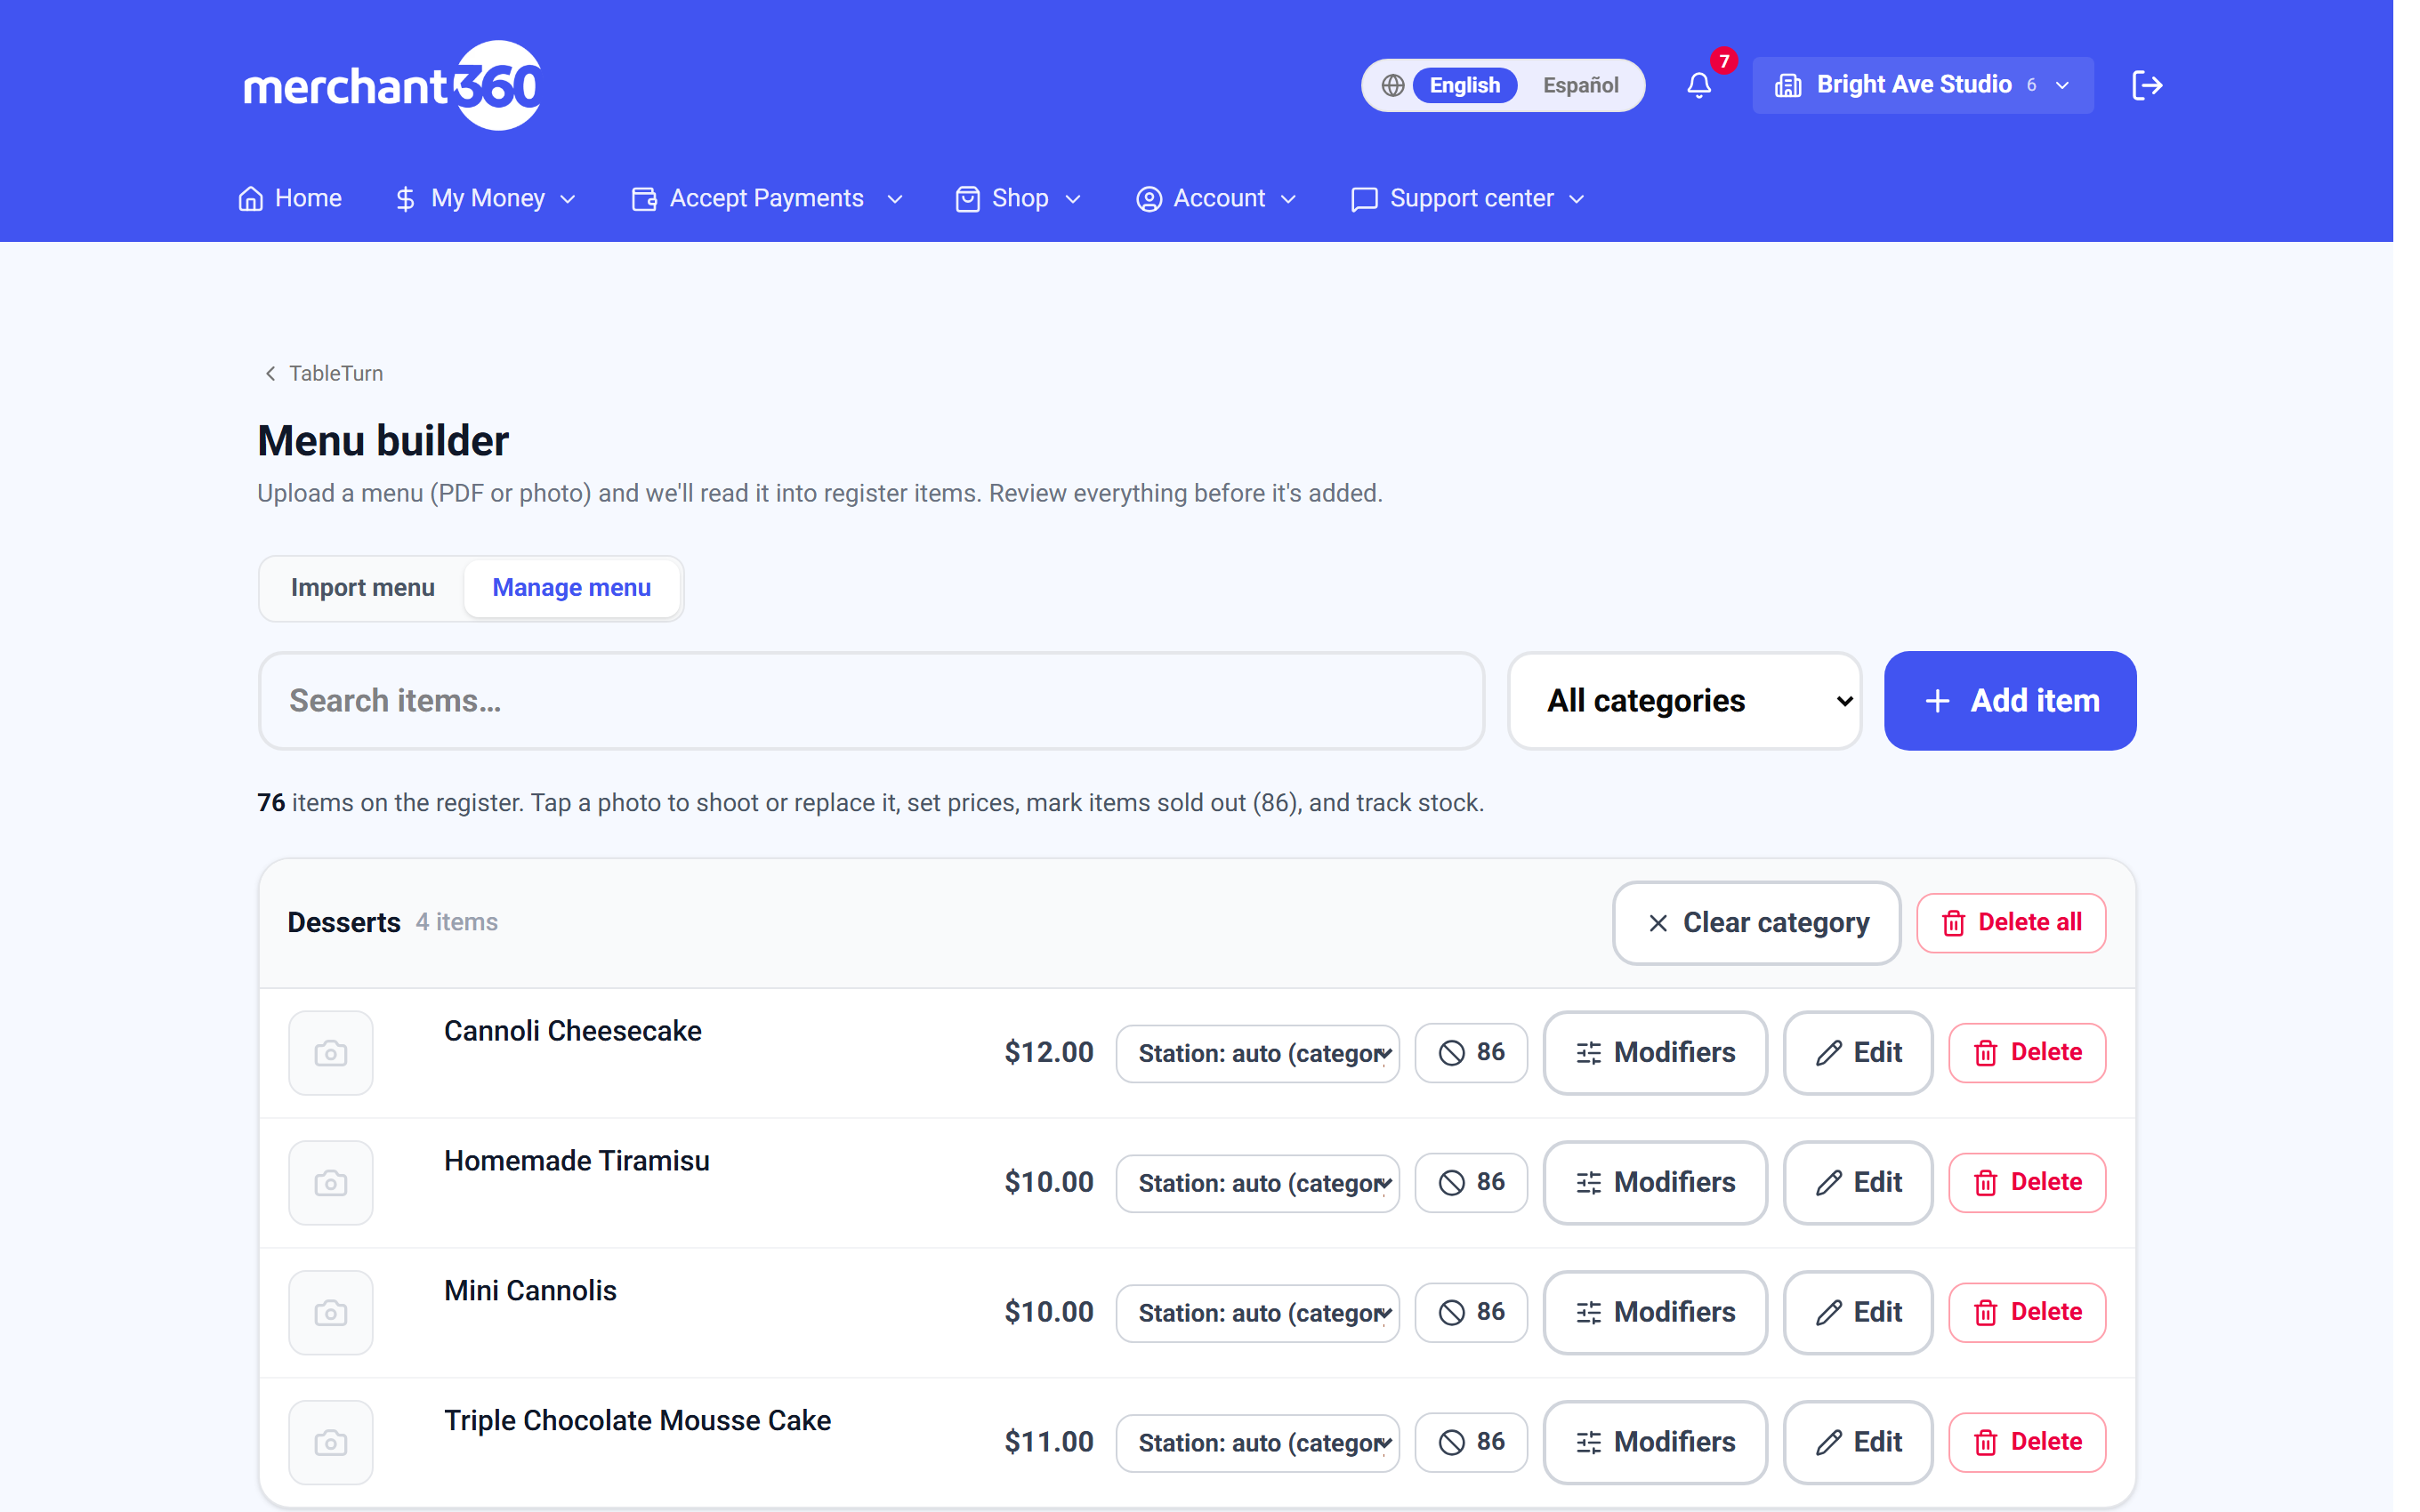
Add item takes a name, a price and a category, and that's genuinely all that's required. The list groups items by category, with a search box and a category filter above it.
Each row edits in place for the fast changes – name, price, track-stock, tags – with Save and Cancel. For everything else, the row's edit button opens the full item editor.
- 1Tap Add item, enter the name, price and category, and save.
- 2Find it again with the search box or the category filter.
- 3Tap into the row to change the name or price inline.
- 4Open the full editor for photos, food cost, description, SKU, allergens and stock.
The item editor, field by field
Photo shows on the register tile and on your online menu. On a tablet the picker opens the camera, so you can shoot the plate as it goes out. Items without a photo get a coloured tile with their initials instead – still perfectly usable.
Name shows exactly as you type it. Category decides which register tab it lands on. SKU is optional and only matters if you're matching against something else. Description appears on online ordering, not on the register tile – it's the sentence that sells the dish to someone on their phone.
Price, Food cost and a live Margin sit in one row. Type the cost and the margin appears immediately, colour-coded: green from 60%, amber from 40%, red below that. Taxable is a checkbox per item, so a taxed kitchen and untaxed retail can live on one menu.
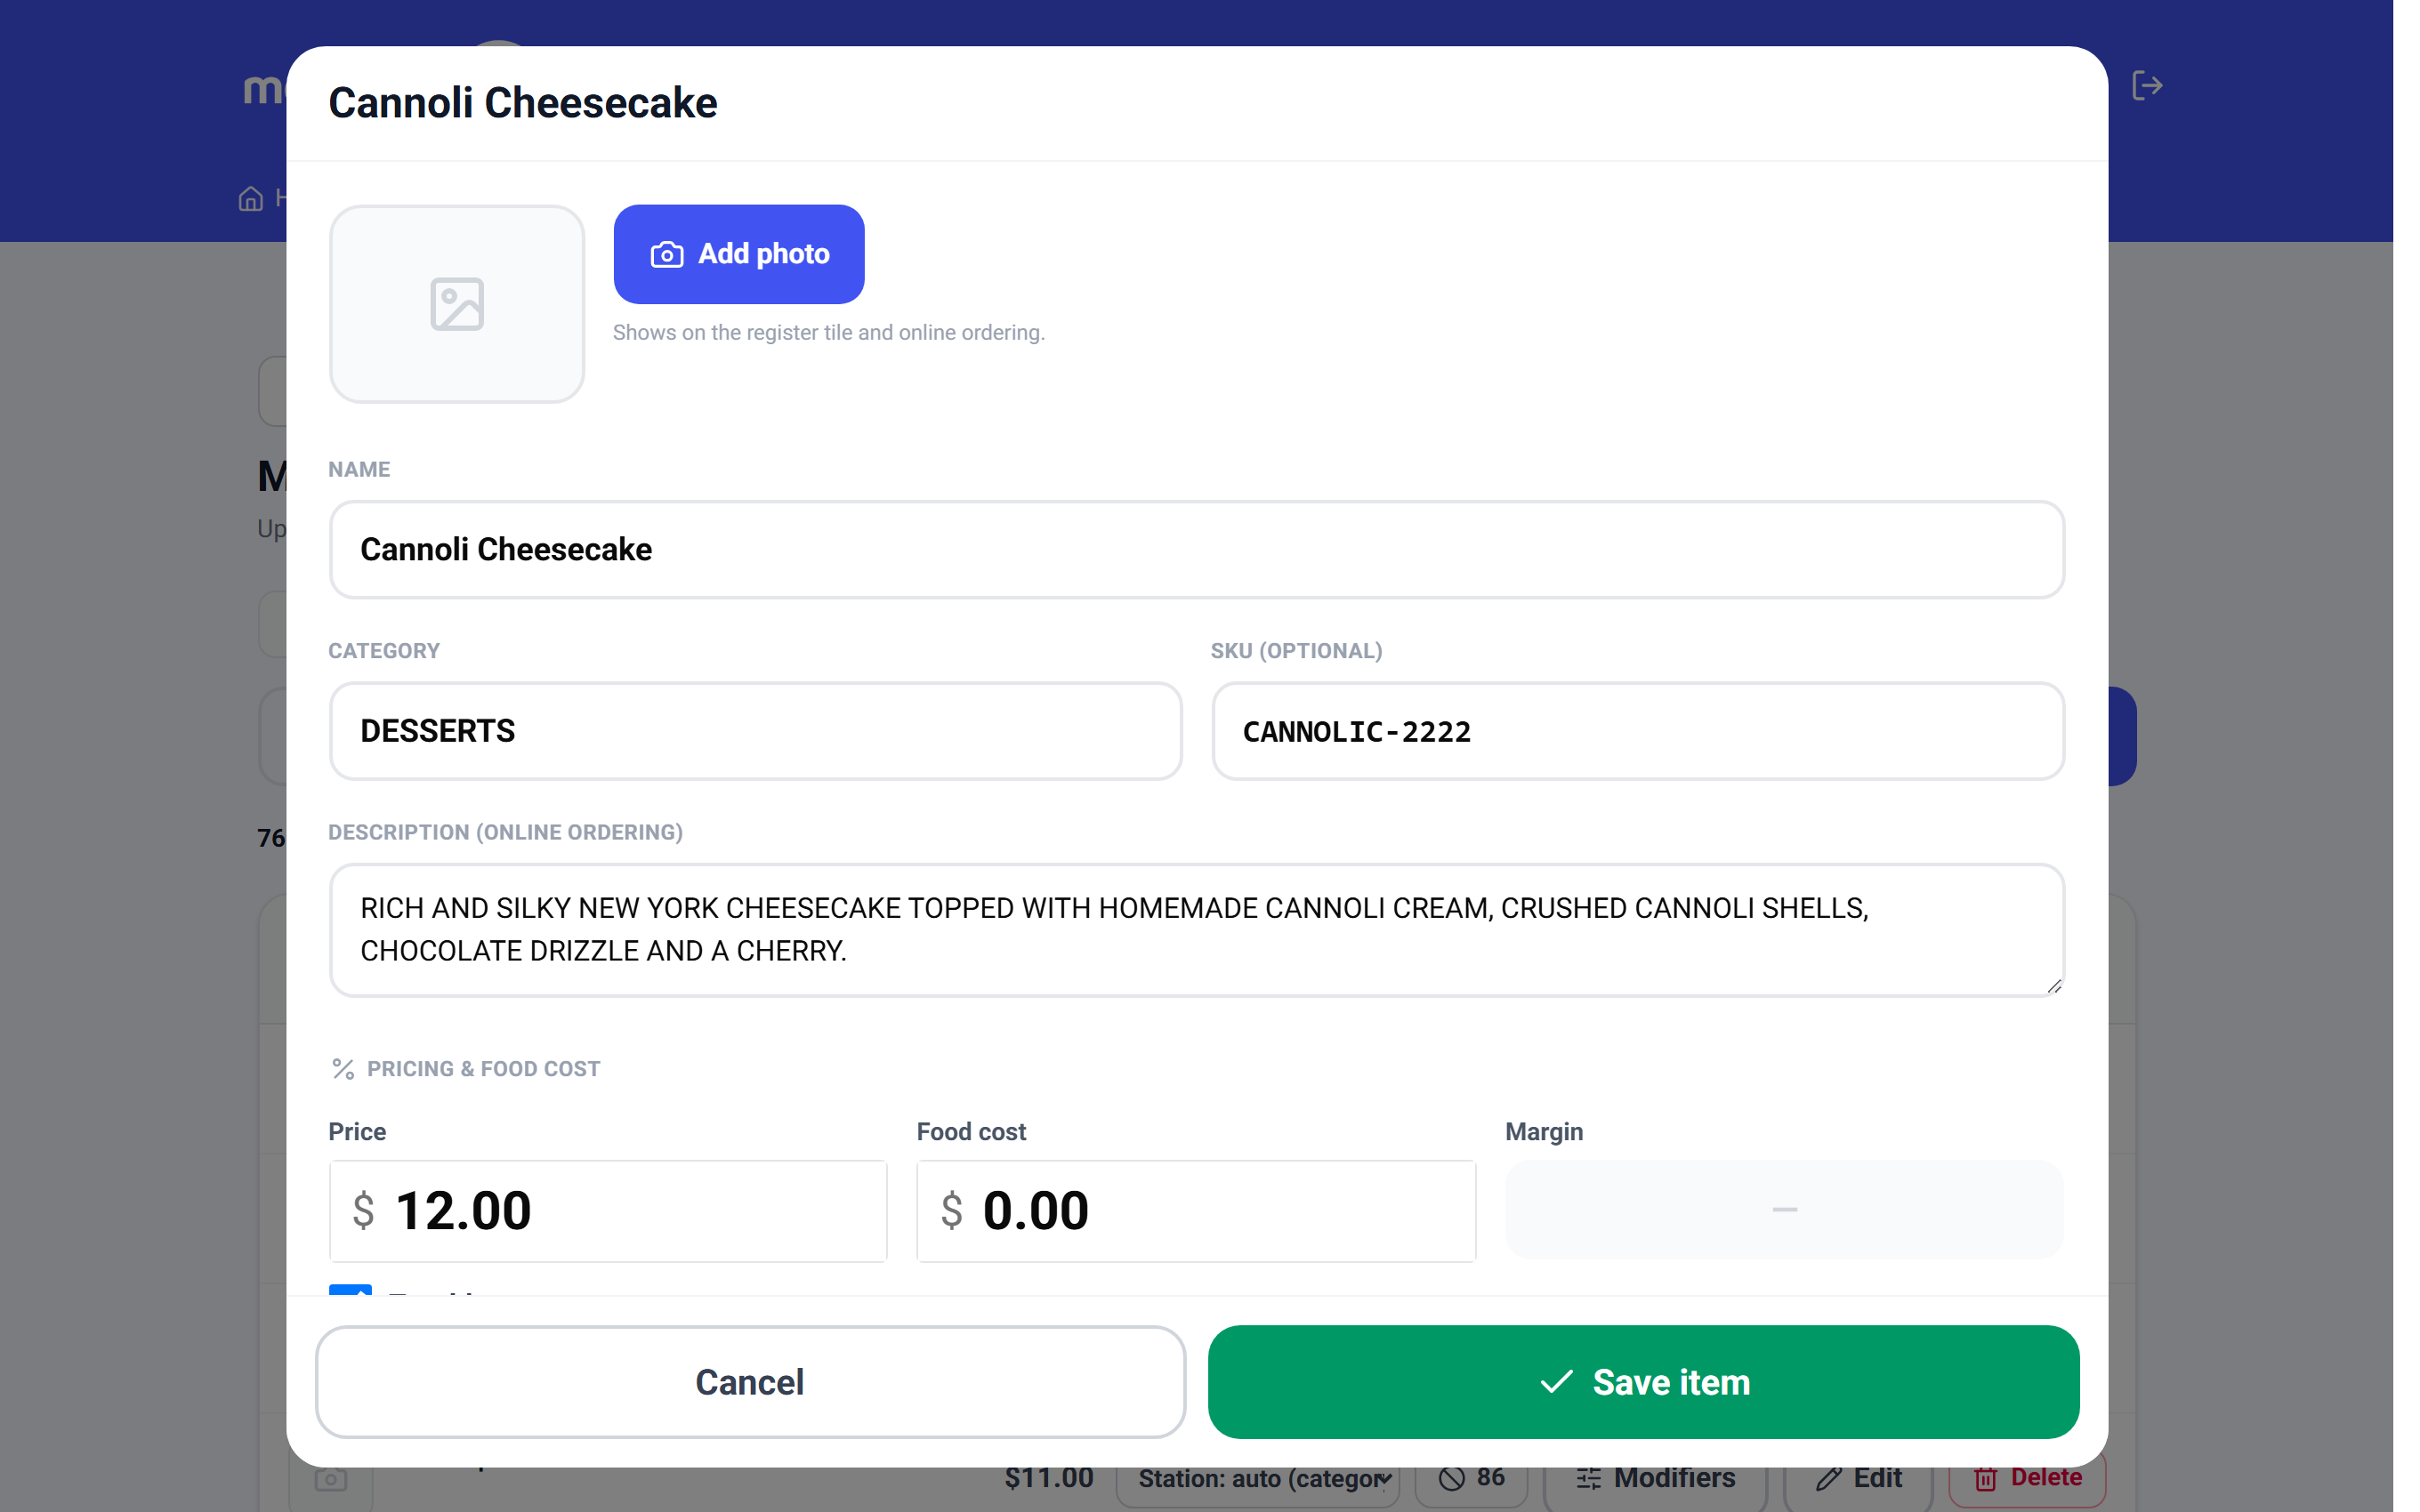
Filling in food cost as you build the menu costs seconds per item and turns the Food cost & recipes report on. Doing it later means opening ninety items twice.
Stock tracking and 86
Track inventory turns on a count. Set On hand and it counts down as the item sells, showing the remaining number on the register tile and going sold out on its own at zero. Use it for the things you genuinely run out of – twelve specials, a keg, a case of a seasonal bottle – not for everything.
86'd (sold out) is the manual switch, and it's the same state the register's 86 button sets. Either way the item greys out everywhere at once, including online ordering, so nobody orders a phone pickup of something the kitchen is out of.
Categories
Categories are the organising idea of the whole menu: they become the register's tabs, the sections of your online menu, and – unless an item overrides it – the routing that decides which kitchen printer or KDS station a ticket goes to.
Name them the way your staff think, not the way a menu designer would. Drinks / Apps / Entrées / Desserts beats a clever scheme every time, because someone is going to be looking for it one-handed with a queue building.
The order is yours too. Tap Reorder in the Manage tab and arrow the list into shape – entrées before desserts, drinks last. The register's tabs, your online menu's sections, and the menu schedule all follow it. New categories you create later slot in alphabetically after the ordered ones until you place them.
Each category header carries two buttons, and they are not the same thing. Clear category removes the label only – the items stay, just uncategorised. Delete all deletes the category and every item in it.
Read that last pair twice. Clear category is the safe one. Delete all is exactly as final as it sounds.
Modifier groups
A modifier group is a question the register asks when the item is rung. Sizes, temperatures, sides, milk, toppings – anything where the guest gets a say.
Open Modifiers on an item's row. Each group has a name, a Pick one / Pick any / Pick #… setting, and a Required checkbox. Pick #… is for counted choices – "pick exactly 2 sauces", "up to 3 toppings" – set the Min and Max and the register enforces the count. Required is the one that matters: it's what stops a steak reaching the grill with no temperature attached, because the register won't let the item onto the ticket until the question is answered.
Every option takes an upcharge and, optionally, its own food cost – so a $2 add of bacon that costs you 70 cents shows up correctly in your margins rather than quietly eating them.
The arrows on each group and option set the order they appear in – on the register sheet and the printed ticket alike.
- 1Open the item and tap Modifiers.
- 2Add option group – name it (Protein, Temperature, Size), choose Pick one or Pick any, and decide whether it's required. For counted choices switch the group to Pick #… after adding it.
- 3Add options one at a time with their upcharge. Press Enter to keep going.
- 4Fill in each option's cost if you're tracking food cost.
- 5Changes save as you make them. Done closes the editor.
Build a group once, use it everywhere
Nobody should build the same Rubs group forty times. Two tools kill the busywork:
The library. Every group you build is saved to your modifier library automatically, and every edit keeps the library copy in sync – there's nothing to remember to save. Any item's Modifiers editor can pull a group in with Add from library, or Apply to items… stamps it onto a whole checklist of items at once. When a group is on several items and you change the recipe, tap Push to N other items on its card to update all of them. To browse or edit the library itself, open Manage menu → Modifiers.
Copy from another item. Grabs an entire modifier tree – groups, options, prices, follow-up questions – from one item onto another. The "make this taco like that taco" button.
The menu importer also builds choice groups automatically now: a menu that says "tossed in your choice of rub" imports with the Rub group already attached to every wing item.
Build your house-wide groups (rubs, sauces, sides) on one item first – they land in the library automatically, and each new item is then two taps from fully modified.
Follow-up questions that only appear when they're needed
Some questions only make sense after an earlier answer. Asking every guest for a steak temperature when half of them ordered the salmon is how staff learn to tap through prompts without reading them.
Any option can carry its own follow-up group. Under an option, tap Add a follow-up question to "Salmon" and build a Temperature group there. It's shown only when that option is chosen, and it nests – pick Burger, then a side, then that side's sauce.
Build the branching menu once, properly, and the register stops depending on whether the server remembers to ask.
Quick prefixes for special instructions
Special instructions aren't modifiers and shouldn't be typed as sentences. TableTurn ships a set of prefixes the register taps to build them: No, Light, Extra, Half, Add, Sub, and On side.
Each prefix makes its own line, and prints in capitals exactly as built: NO onions, EXTRA cheese, dressing ON SIDE. On side prints after the item; the rest print before it.
You can edit the set – rename a prefix, change what it prints on the ticket, change its colour, or turn one off – under settings, Tags & rules.
Allergens
The item editor carries the FDA major nine: milk, egg, peanut, tree nut, soy, wheat, fish, shellfish, and sesame. Tap the ones an item contains.
Allergens badge on the register tile and carry through to the kitchen ticket and the KDS, so the information travels with the order instead of depending on someone remembering to say it.
Tag the allergens as you build each item. Going back through a finished menu to add them is a job nobody schedules, and the one item that gets missed is the one that matters.
Menu schedule – showing the right menu at the right time
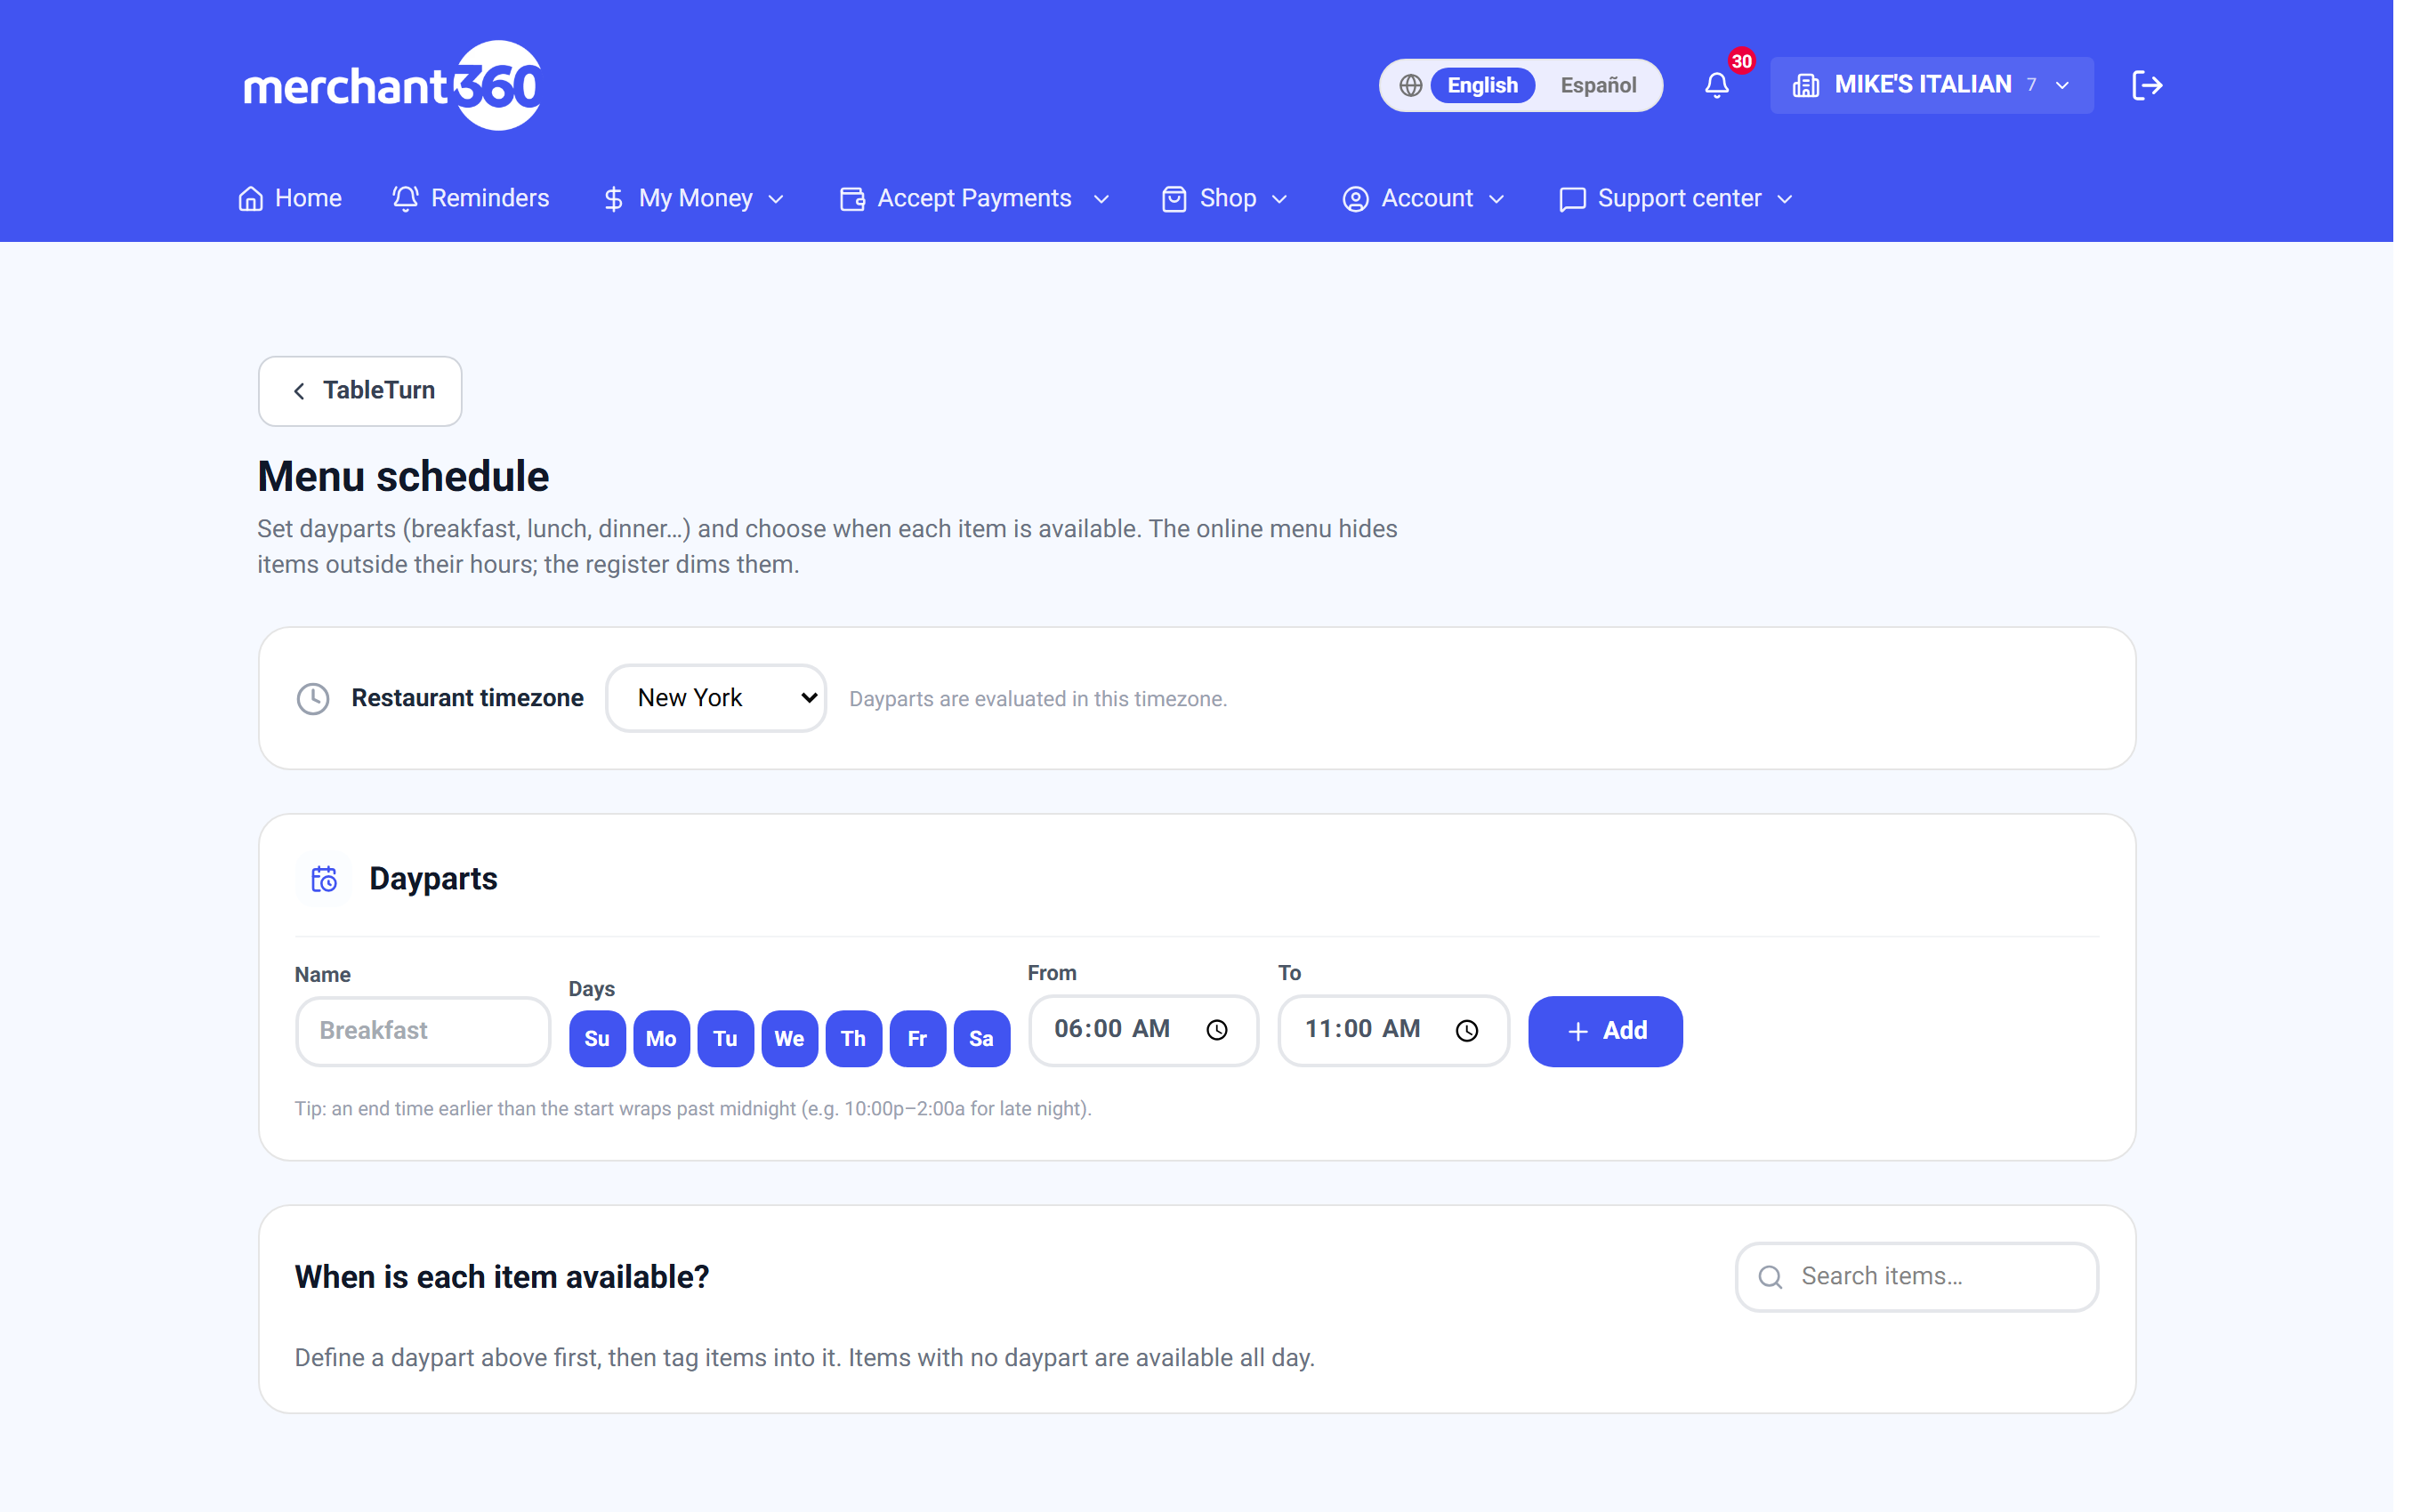
A daypart is a named window: Breakfast on weekdays 6:00 to 11:00, Late night Friday and Saturday 10:00pm to 2:00am. Items tagged into a daypart are available inside it and out of window outside it.
The two sides behave differently, on purpose. Your online menu hides off-schedule items, because a guest ordering pancakes for a 3pm pickup is a problem the kitchen has to phone them about. The register only dims them, and staff can still ring one – a guest at the counter asking for pancakes at 3pm is a sale, not an error.
- 1Open Menu schedule and check the restaurant timezone at the top – every daypart is evaluated in it.
- 2Add a daypart: a name, the days it runs, and a start and end time.
- 3An end time earlier than the start wraps past midnight, so 10:00pm–2:00am is one late-night window rather than two.
- 4Below, tag items into dayparts by tapping the daypart chips on each row. Items with none are marked All day.
- 5Each category header has its own row of chips – tap Breakfast on the *Entrees* header to tag or untag every entree at once instead of going item by item.
- 6Assigning dayparts always limits the item to those windows – even ticking every daypart is not the same as All day. Leave an item untagged to sell it all day.
- 7Switch a daypart to inactive to park it for a season without deleting it and rebuilding it next year.
Favorites pages
Categories organise the menu logically. Favorites pages organise it by what actually sells.
A Favorites page is a hand-picked, hand-ordered list of items that appears as an amber tab above the category tabs on the register. You get up to five. Build them under settings, Quick-picks.
The order you set is the order the register shows, so put the top three sellers where the thumb already is. On a busy counter this is the single biggest speed change you can make to the grid.
Different shifts sell differently. A **Morning** page and a **Bar** page beat one page trying to cover both.
Sending items to the right kitchen station
By default an item routes by its category – drinks to the bar, food to the kitchen. On Pro, where you've defined stations, each item row gets a station dropdown so you can override that for one item without reshaping your categories.
Station: auto (category) is the default and is right for nearly everything. Use the override for the exceptions – the dessert that's plated at the bar, the app that comes off the fryer rather than the grill.
Routing is covered properly in the Kitchen chapter. Set your categories up sensibly first; per-item overrides should stay rare, or the routing becomes impossible to reason about.
How changes reach the register
Menu edits are live. A price change, an 86, a new item, a reordered Favorites page – all of it lands on every register, the online ordering page, and the kitchen displays without anyone republishing anything or restarting a device.
Past sales are never rewritten. A sale records what it charged at the time, so changing a price today doesn't quietly alter yesterday's numbers.
Mid-shift price change? Make it in the builder, not with a one-time price at the register. One-time prices are for one order; the builder is for everyone from now on.