
The register (counter service)
Ring items, take payment, and keep the line moving.
- How the register is laid out
- The top bar, button by button
- Ringing items
- Ringing several of something – the Qty pad
- Modifiers and special instructions
- Long-hold a tile for the item sheet
- Open items and quick amounts
- Working the ticket
- Order details – name, guests, order type
- Tabs – park an order and pick it up later
- Attaching a customer (and their loyalty)
- Taking cash
- Taking a card
- The other four tenders
- Dual pricing at the register
- Discounts, comps and tax exempt
- Round up for charity
- 86 and stock
- All orders – Tabs, Needs tip, Closed
- The cash drawer
- Table Time at the register
- Locking, cashiers and closing out
- When something goes wrong
- Manager PIN requirements
- The Update ready pill
How the register is laid out
The register is three bands. A blue top bar across the top holds everything that isn't ringing – the Menu, the floor or New Order key, All orders, Online orders, and the kitchen display. The product grid fills the left two-thirds: a toolbar, then your Favorites and category tabs, then the item tiles. The ticket sits down the right side, with the tenders pinned to its bottom edge so you can take a payment without scrolling.
That layout shifts slightly depending on your service style. In counter service the ticket carries the tenders all the time – ring, pay, next guest. In table service the ticket is bare while you're ordering (its actions are Send, Send & Stay, and Pay), and the tenders only appear once you tap Pay. This chapter covers counter service; Table service has its own chapter.
Tiles show a photo if the item has one, or a solid coloured tile carrying the item's name if it doesn't. The colour is derived from the item itself, so it never shuffles between visits and staff learn the shape of the grid.
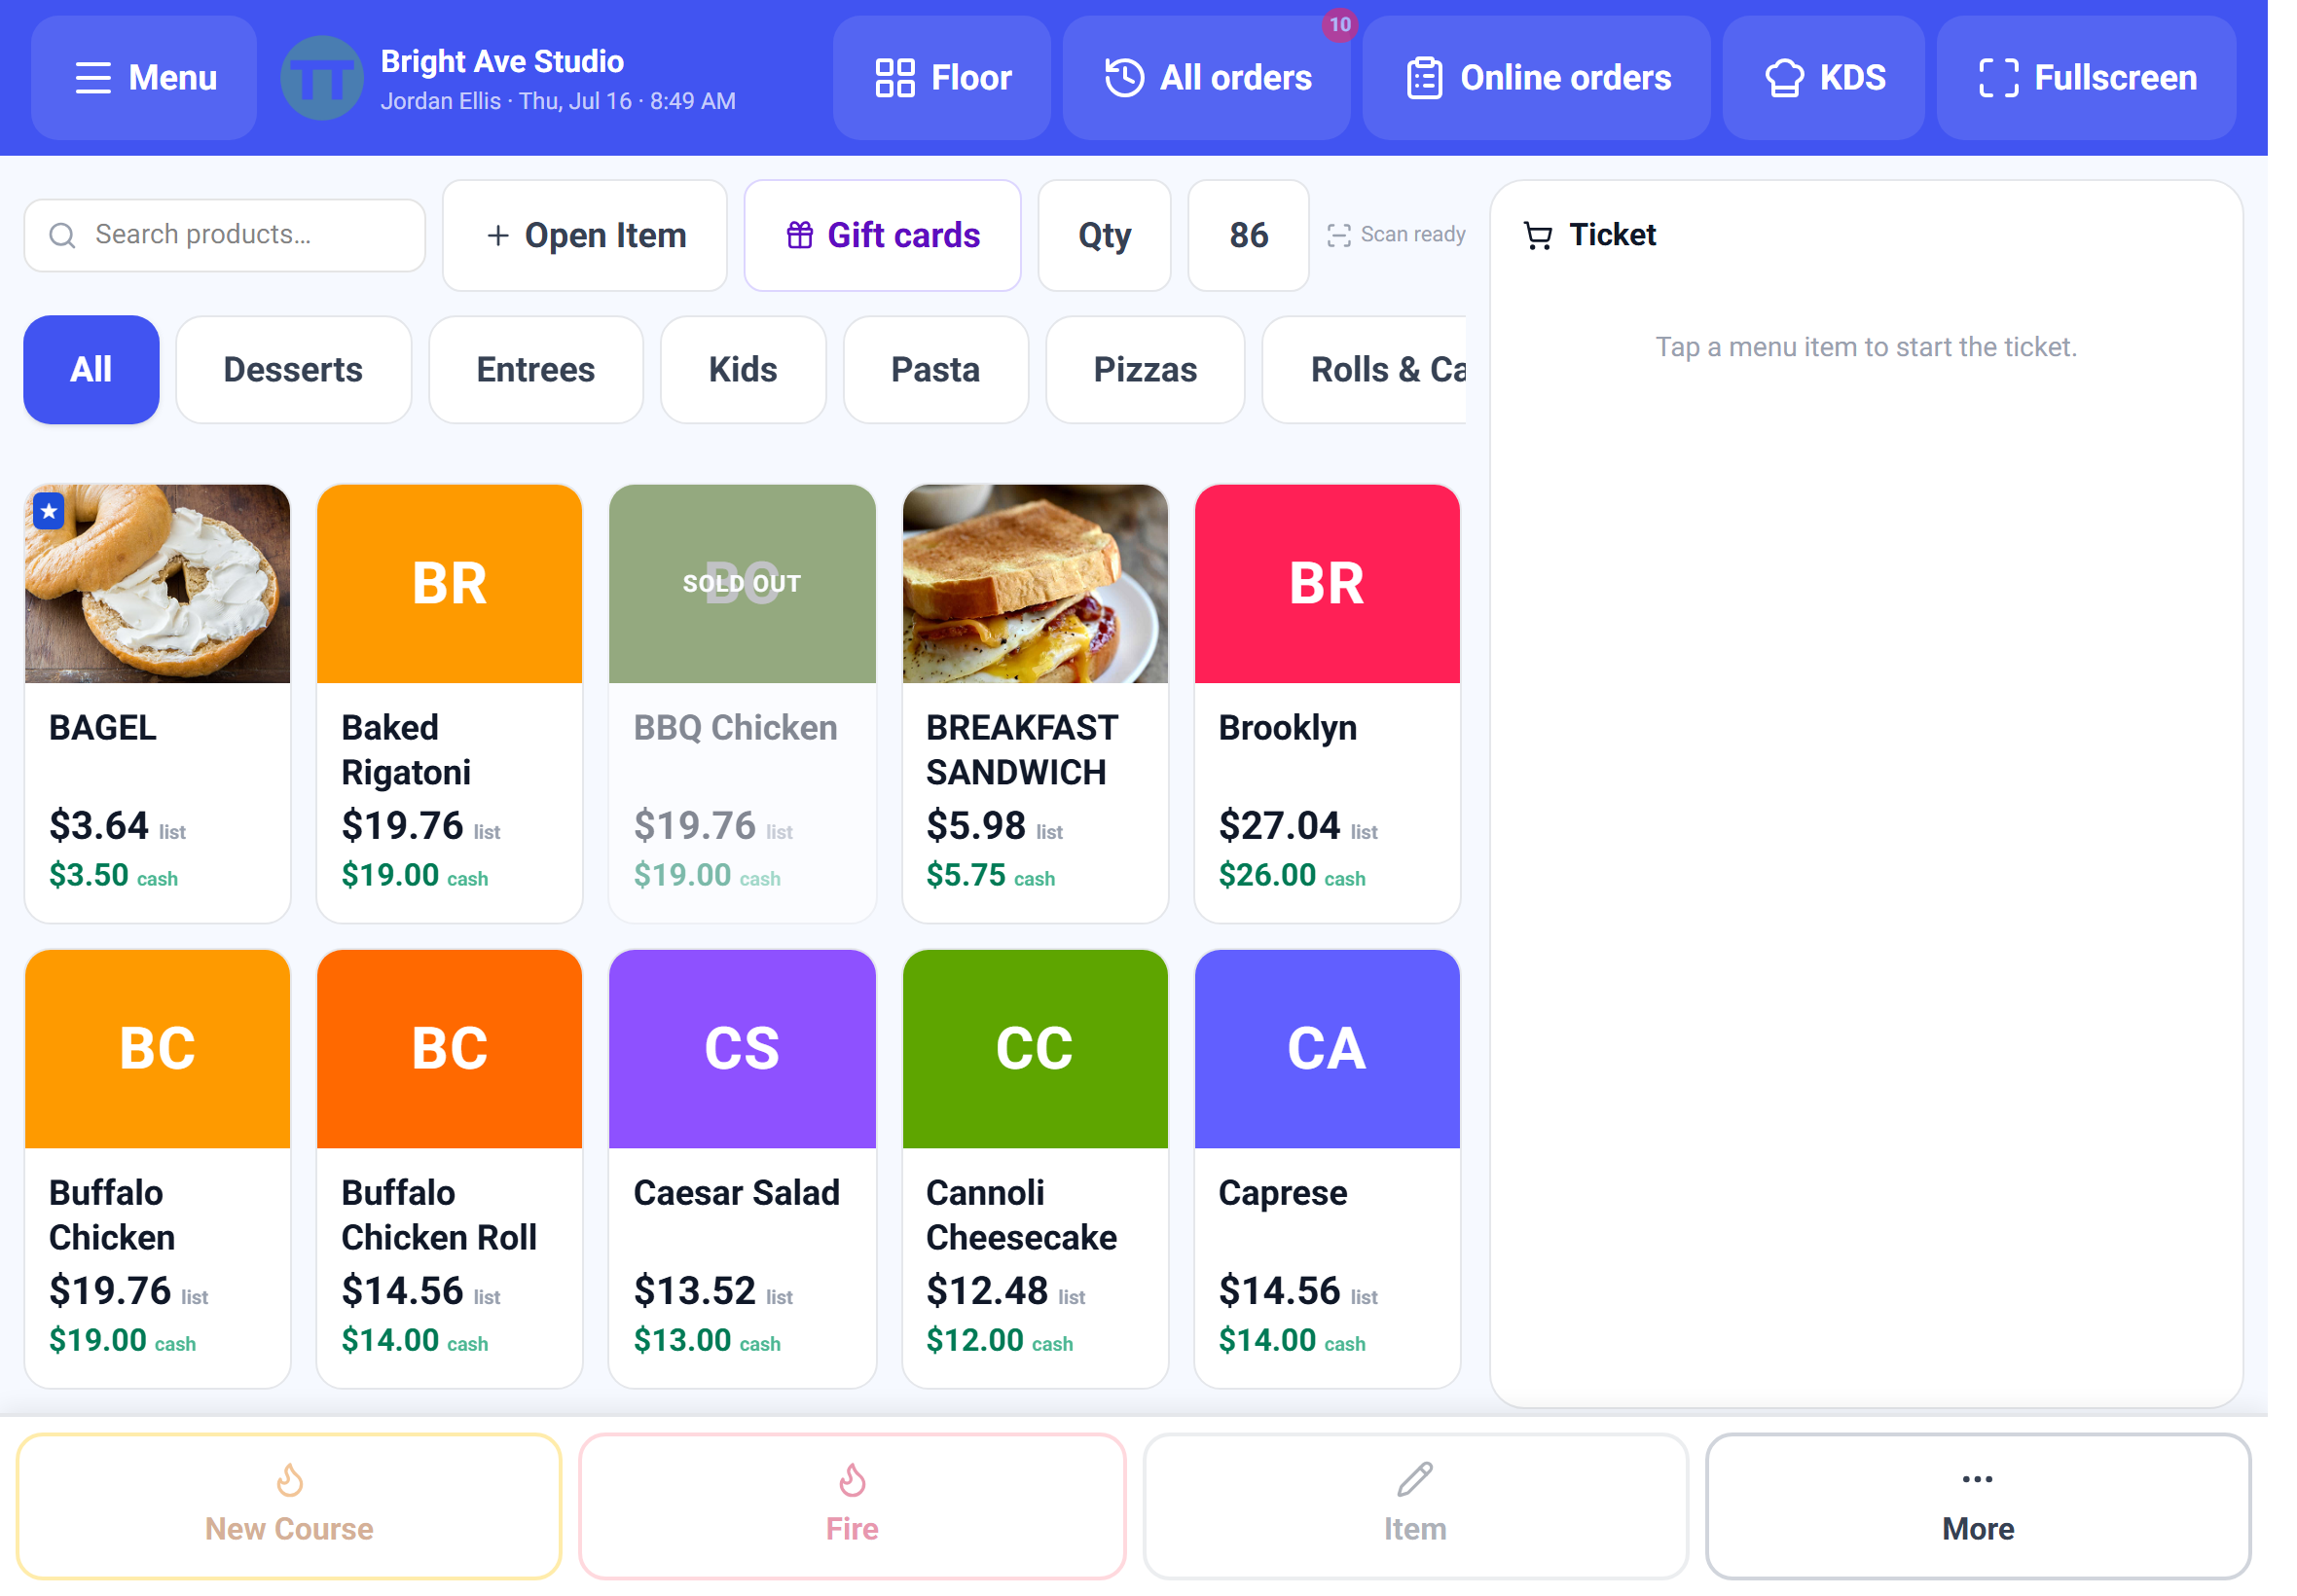
Register **Menu → Button size** flips between Large and Compact, and it's stored per device. A 15-inch counter screen can run Compact while the 11-inch handheld stays Large.
Ringing items
- 1Tap a tile. The item lands on the ticket; if it has required modifiers, the modifier sheet opens first.
- 2Use the category tabs under the toolbar to move between sections of the menu – All clears the filter.
- 3Tap an amber Favorites page to show a hand-picked list of top sellers in the order you arranged them. Favorites override the category filter; tap the page again to drop back out.
- 4Type in Search products… to find anything by name – faster than hunting the grid during a rush.
- 5Barcodes scan straight into the ticket. On the tablet apps there's a Scan button for the camera; on a counter machine with a USB scanner you just scan, no button, and the matching item rings.
The toolbar, Favorites and category tabs stay fixed while only the tile grid scrolls, so the controls you need never scroll away mid-order.
Ringing several of something – the Qty pad
Six coffees is one action, not six taps. Tap Qty, type the number, and the button shows Qty ×6. The next tile you tap rings six of it, then the multiplier resets to 1.
- 1Tap Qty in the toolbar.
- 2Tap the digits – the pad shows Next item × 6.
- 3Tap the item. Six ring on.
- 4×1 on the pad clears the multiplier if you set it by mistake.
Modifiers and special instructions
If an item has option groups, tapping it opens the modifier sheet. Required groups have to be answered before the item can be added, which is what stops a steak reaching the grill with no temperature on it. Choosing an option can reveal a follow-up group – pick Salmon, get asked for a temperature.
Underneath the options is the instruction builder. Rather than typing free text every time, you tap a prefix – No, Light, Extra, Half, Add, Sub, On side – and then the thing it applies to. Each prefix makes its own line, and that's exactly how it prints: NO onions, EXTRA cheese, dressing ON SIDE. There's a Note button for anything the prefixes don't cover.
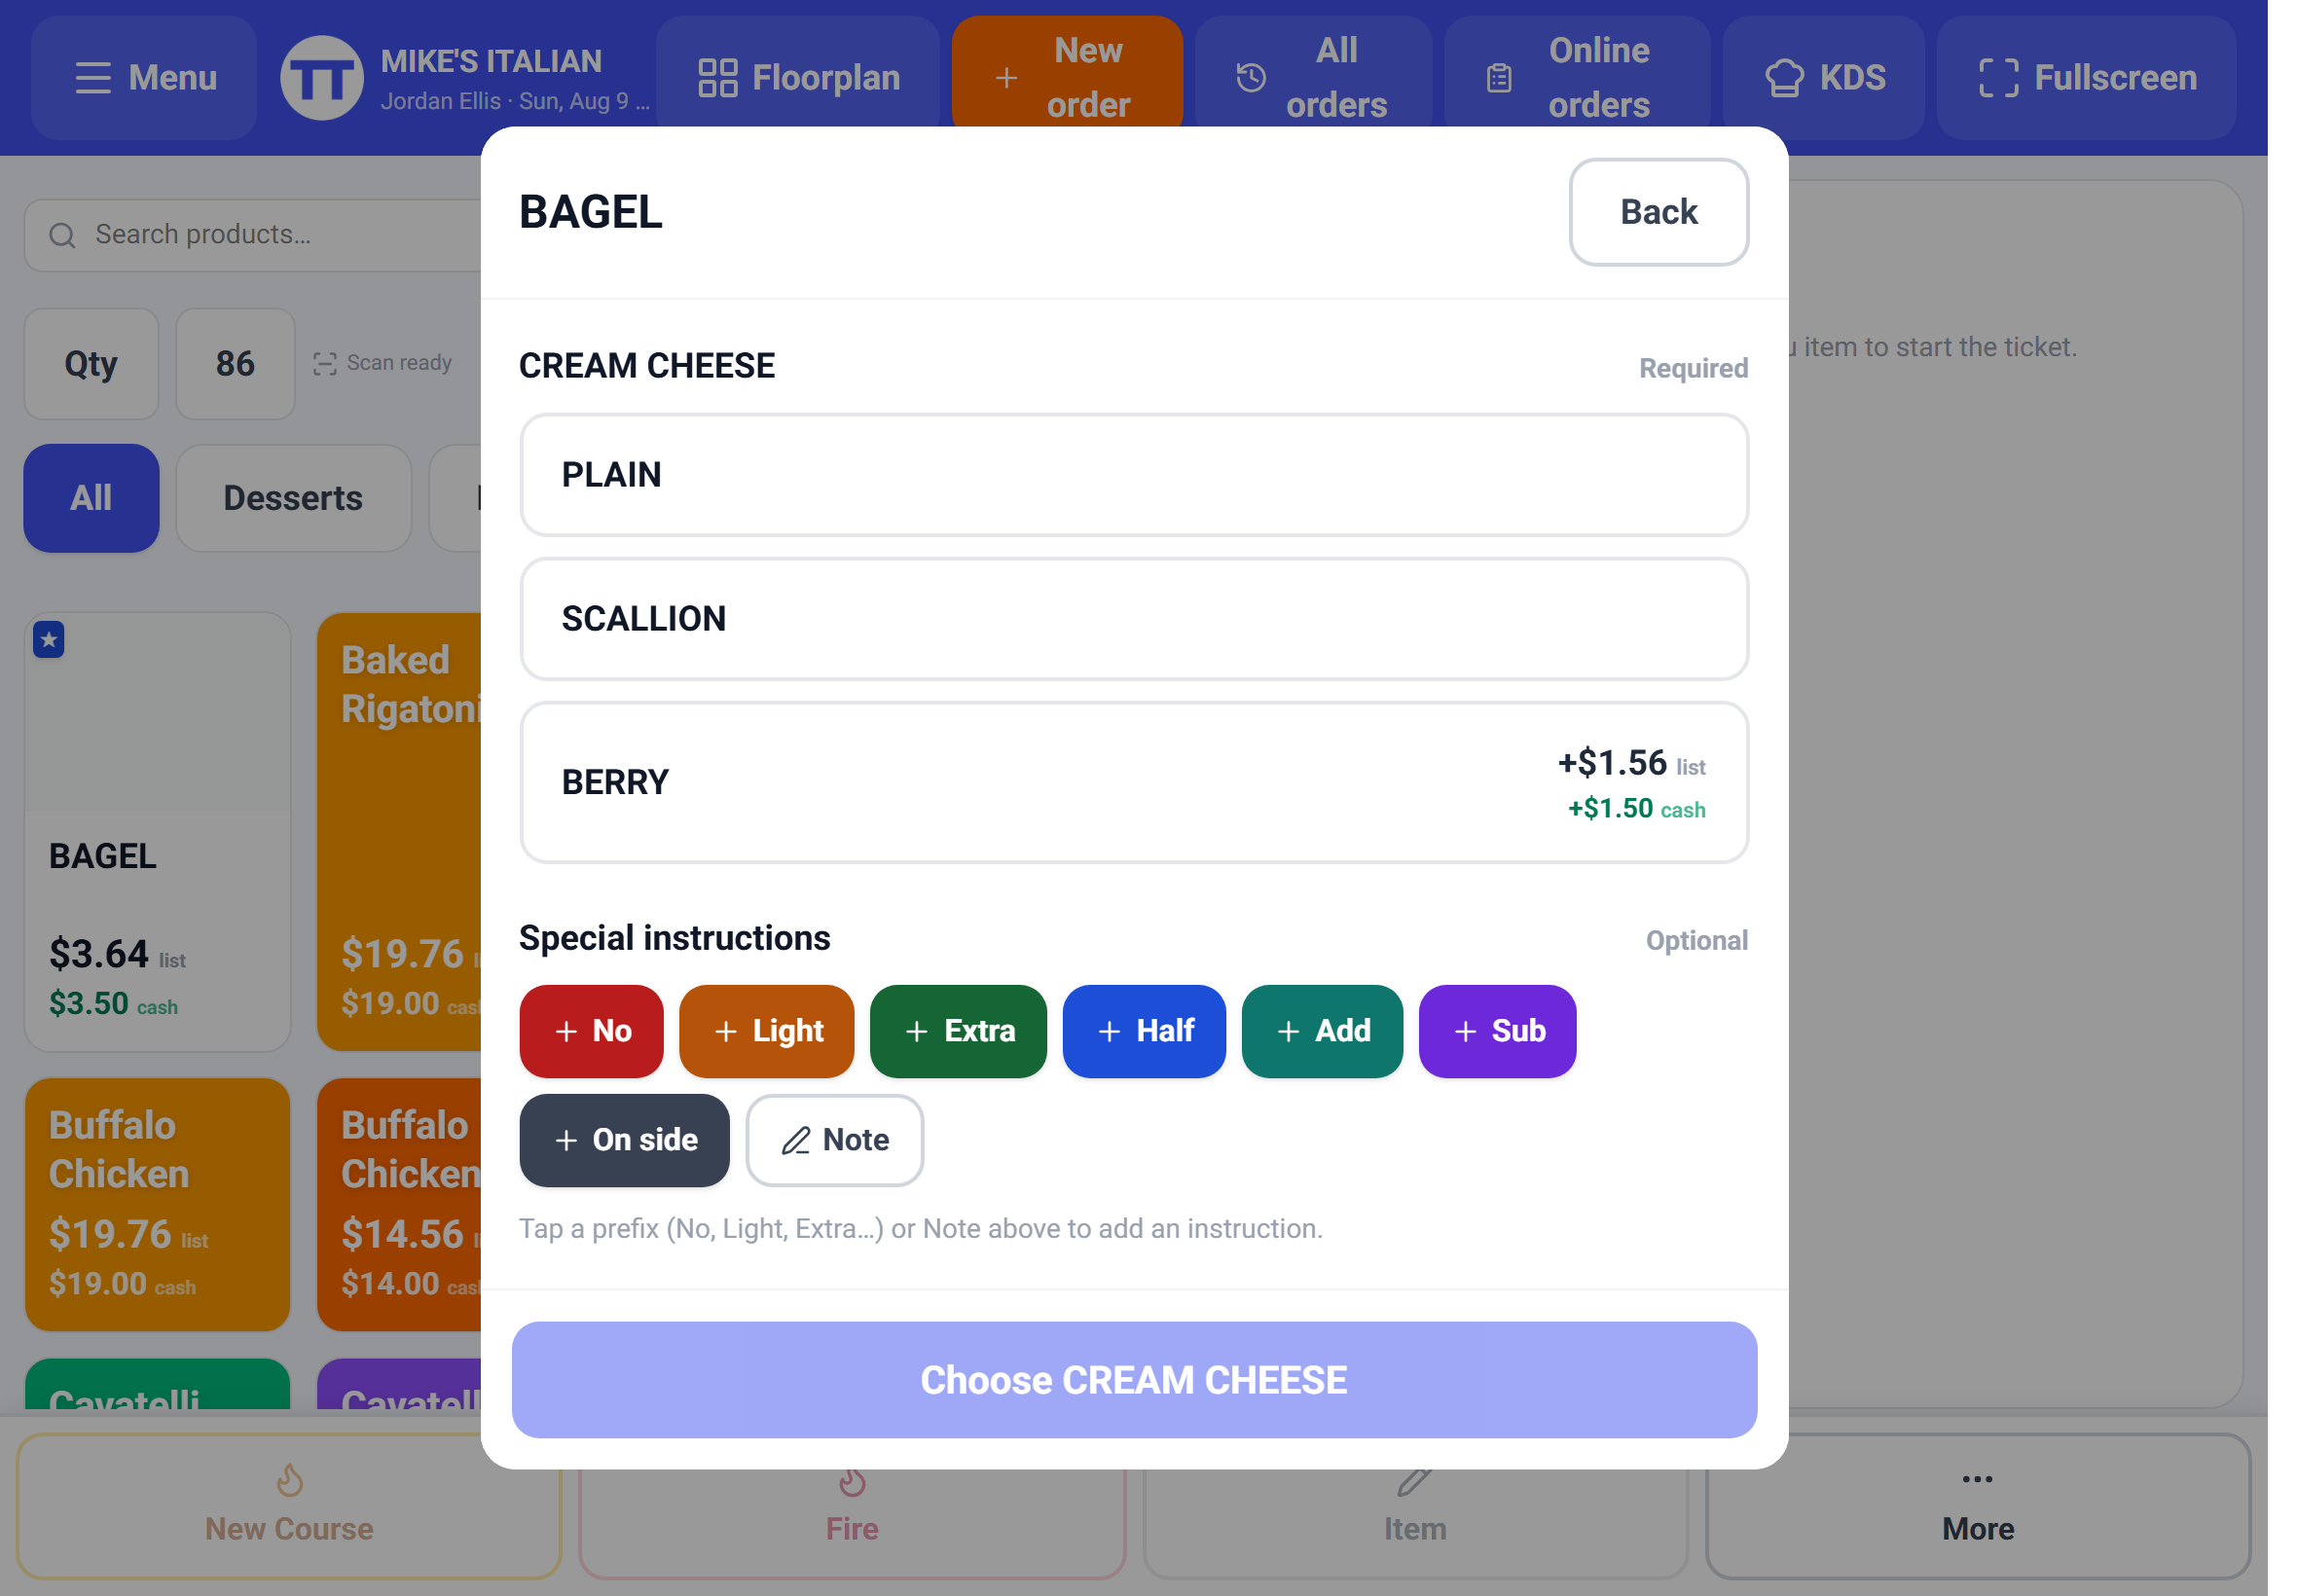
Prefixes print in capitals on the kitchen ticket on purpose. A cook scanning a rail reads NO ONIONS in a glance; "no onions please" buried in a note is what gets missed.
Long-hold a tile for the item sheet
Press and hold any tile – don't tap – and a sheet opens with the things you occasionally need to do to one item without leaving the register.
- 186 (mark sold out) – or Un-86 if it's already out.
- 2Add with a note / instruction – rings it and opens the instruction builder.
- 3Add – SEE SERVER – rings the item flagged for the server to handle, with your name attached.
- 4Add with a discount – rings it already discounted (manager PIN if you require one for discounts).
- 5Set a one-time price – this order only. The menu price is untouched.
One-time price is the right tool for a damaged item or a promised deal. Changing the menu price to do it, then changing it back, is how prices end up wrong on a Tuesday morning.
Open items and quick amounts
Not everything is on the menu. Custom (called Open Item in table service) rings any amount you type.
You can define open item types in settings – Open Food, Open Liquor, Open Retail, whatever fits – each with its own taxable setting. Tap the type first and the amount rings with the right tax treatment and a label that means something on the report, instead of a pile of anonymous "Custom" lines.
- 1Tap Custom in the toolbar.
- 2Tap an open-item type if you use them – non-taxable types are marked · non-tax.
- 3Type a label if you want one, then tap the amount box and enter the price on the register's own keypad.
- 4Tap Add. Or skip all of it and hit a Quick key – $1, $5, $10, $20 ring instantly.
Opening on open items is a perfectly good plan. Plenty of restaurants take real money on day one this way and build the menu properly in week one.
Working the ticket
Everything on the ticket is tappable. Tap a line to change quantity, re-pick its modifiers, or add a note. Tap the price on a line to discount it, comp it, or set a one-time price – discounts can be set to require a manager PIN, which is what keeps comps accountable.
The three buttons across the top of the counter-service ticket are Customer, Save Tab (or Update Tab, when you're editing one), and Clear. Clear can be set to ask for confirmation first, so a stray thumb doesn't wipe an order.
Under the items the ticket totals up: subtotal, any order discount, tax with the rate shown, auto-gratuity if the party is large enough, tip, and the total. The tax rate is read from your settings and cannot be edited at the register – a cashier can't change the rate mid-sale.
Order details – name, guests, order type
How much the register asks for is your choice. In settings you can turn on Ask for a name on the order, Track guest count, and Ask for an order type, and you can make those details required before ordering starts.
With order type on, the ticket shows Dine-in / Takeout / Delivery. Picking Dine-in adds a Choose table button that opens your floor plan – the table you pick becomes the order name, which prints on the kitchen ticket and shows on the floor and the KDS.
A name on the order is what turns "order up" into "Maria, order up". If you run a pickup counter, turn it on and turn on numbered pickup stubs with it.
Tabs – park an order and pick it up later
A tab is an order saved and set aside. Bar tabs, a customer who wandered off to find their wallet, a phone order being built between walk-ups – all the same mechanic.
- 1Tap Save Tab on the ticket, or hit the orange New Order key in the top bar, which parks the current order and starts a fresh one in one press.
- 2Name it, or let the customer's name carry it.
- 3Get it back from All orders → Tabs. Tap the card and it recalls into the ticket exactly as you left it.
- 4Keep ringing, then take payment normally. Saving again updates the tab rather than creating a second one.
The top bar badges how many tabs are open, so nothing sits forgotten. If you don't want tabs at all, switch **Open tabs** off in settings and the buttons disappear.
Attaching a customer (and their loyalty)
Tap the amber Customer button to search your customer list or add someone new mid-sale. Attaching a customer emails them their receipt automatically, lets you charge a card they've saved, and drives loyalty.
With loyalty on, the ticket shows their punch count – Loyalty 7/10 – and when a reward is ready a Redeem button appears next to it. The register also flags Regular customer and, more usefully, First visit – welcome them!, so a new face gets treated like one.
Taking cash
- 1Tap Cash on the pinned tender band. The cash sheet shows what's due.
- 2Tap a quick tender – Exact, plus the sensible round numbers above the total ($20, $50, $100 as the amount warrants) – or key the amount on the pad. The pad is the only way to type it; the tablet's soft keyboard never opens.
- 3Change due sits in the pinned footer in large green type, always visible no matter how far the pad scrolls.
- 4Tap Complete cash sale. The drawer kicks if you've set it to, and the receipt prints, emails, or shows on the customer display.
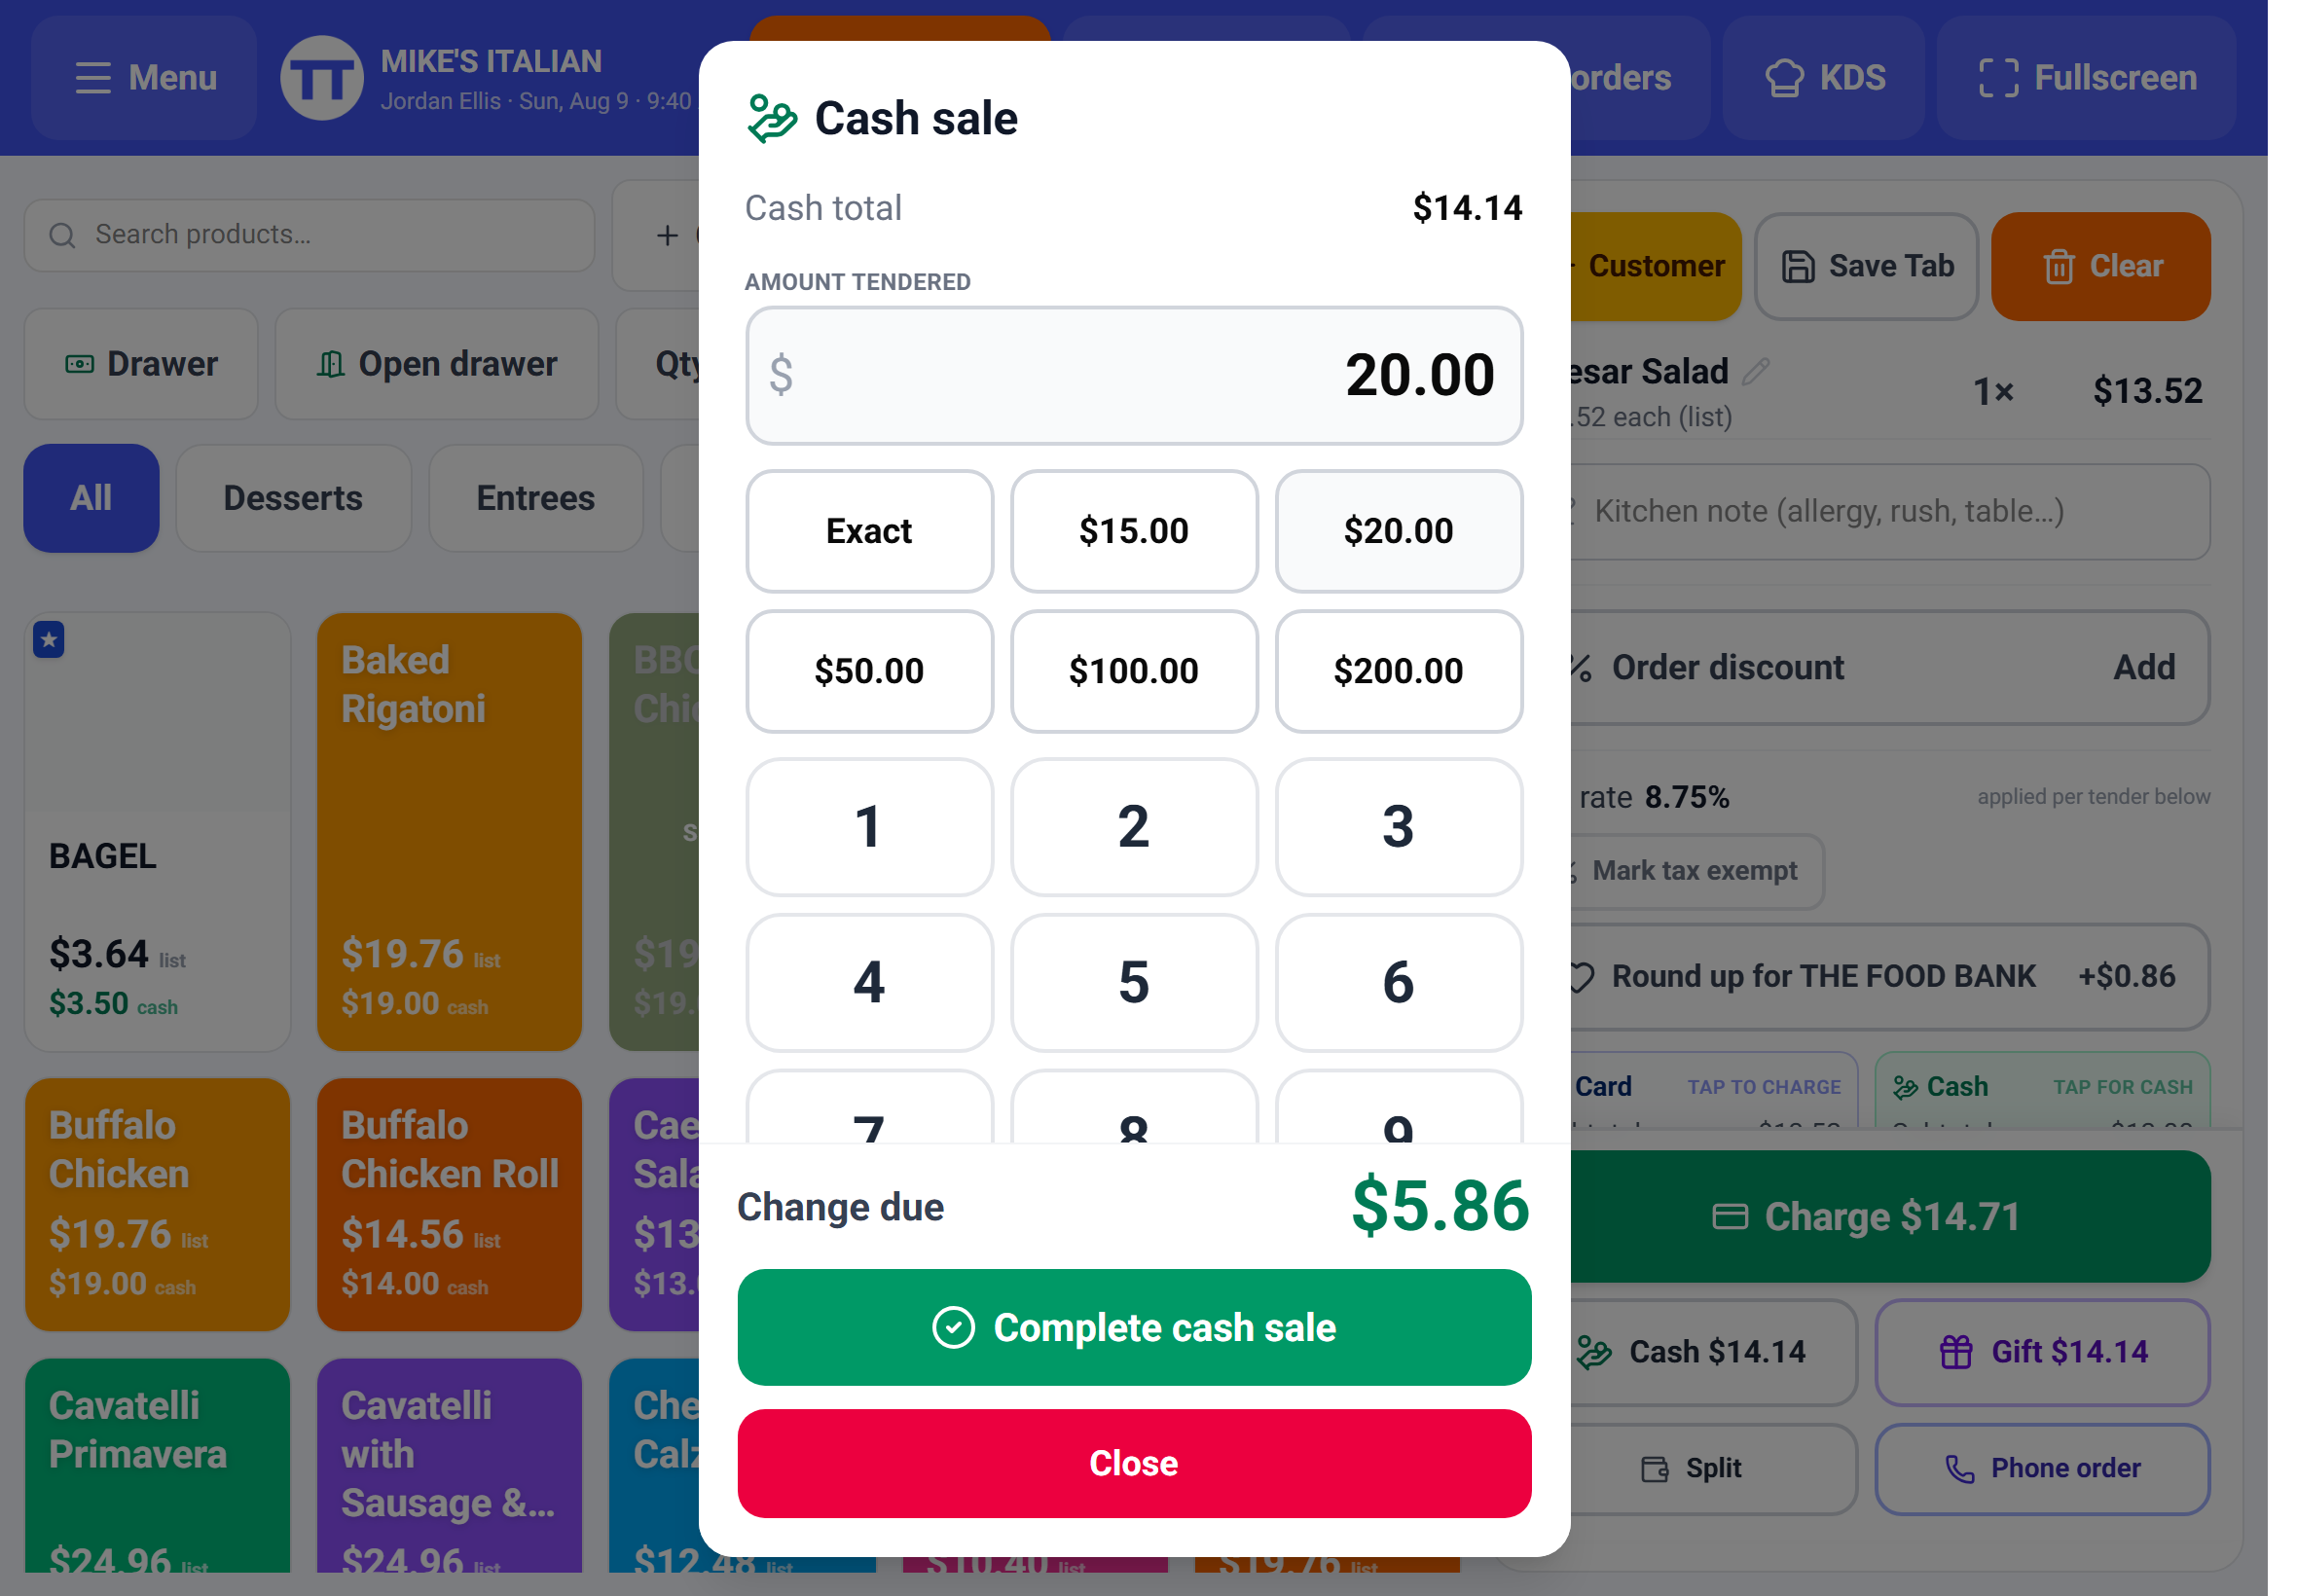
With cash rounding on, the footer shows what the change rounded **from** as well as what to hand back, so you're never guessing whether the register rounded or you misread it.
Taking a card
The big green Charge button sends the amount to your reader. A full-screen overlay shows Charging $48.20… and names the terminal, so on a counter with two readers nobody presents the wrong one. Cancel sale on terminal kills it from the register if the guest changes their mind.
If more than one reader is connected – and you've turned the picker on – a Terminal dropdown appears above the tenders. With a single reader, or a saved default, the register just uses it and says nothing.
Before card processing is live your account runs in cash mode: the Charge button is hidden and a blue note explains that cash and gift still work. Nothing else about the register changes.
The other four tenders
Gift takes payment from an eGift card by code or scan (gift card sales themselves are never taxed).
Card on file appears once a customer with a saved card is attached, and shows the last four so you charge the right one.
Split splits one sale across cash and card. The card leg runs first; when it approves, the cash sheet opens for the remainder with a green confirmation of what already went through, so a mid-split interruption is recoverable.
Phone order keys a card by hand for a phoned-in order – card-not-present, no reader involved.
Split tender is one sale paid two ways. Splitting a **check** between guests is a different thing and lives on the table-service Pay screen – see Payments, tips & pricing.
Dual pricing at the register
With dual pricing on, the tender area changes shape: instead of one Total you get two cards side by side, Card and Cash, each with its own subtotal, tax, tip and total. Tapping a card starts that tender – Card goes to the reader, Cash opens the cash sheet.
Tiles show both prices too, so a guest asking "what's it cost?" gets an honest answer either way, and the guest check prints both totals.
The saving is real and the guest should see it. Present the cash total as the discount it is, not as a card surcharge tacked on at the end.
Discounts, comps and tax exempt
Discounts come in three places: on a line (tap the price), on the whole order (Order discount), and pre-applied from the tile long-hold. Each takes a percent or an amount and a reason from your list, so the report tells you what you gave away and why.
Mark tax exempt clears tax from the order for a nonprofit or resale sale, and the tax line switches to a plain Exempt badge.
Both can be put behind a manager PIN – settings, Require a manager PIN for discounts & tax-exempt. Turn it on and the register asks for the PIN in the moment rather than letting anything through and sorting it out later.
Set up your discount and void reasons before your first shift. Ten seconds of setup is what makes the discount column on the Z-report readable three weeks from now.
Round up for charity
If you've turned on round-up, counter-service sales show a Round up for <your cause> button above the tenders with the exact amount. Tap it on when the guest says yes, tap it off when they don't. The round-up shows as its own line on the total and on the receipt.
86 and stock
86 is a mode, not a menu. Tap the red 86 button and a banner spells out what's happening: tap any tile to mark it sold out, tap it again to bring it back, tap 86 again when you're done. Sold-out items grey out everywhere at once – the register, the KDS, and your online ordering page.
Items with Track stock turned on show their on-hand count on the tile and count down as they sell, going sold-out automatically at zero. Items with a daypart dim outside their hours but staff can still ring them – at the register the schedule is guidance, not a lock. (Your online menu is stricter: it hides them outright.)
86 from the tile long-hold when you only have one item to kill. 86 mode is for the start of a shift when the kitchen hands you a list.
All orders – Tabs, Needs tip, Closed
All orders in the top bar is the register's memory of the day. Nothing disappears from it.
Tabs are open, unpaid orders – tap one to recall it. Needs tip holds card sales that ran without a tip, waiting for the written amount; the section pulses and Close all tips › walks you through them one after another. Closed is everything finished, newest first.
Every closed sale carries four actions: Ring again (rebuilds the same order into a fresh ticket – a gift for regulars who order the same thing daily), Receipt, Kitchen (reprint the kitchen ticket), and Email.
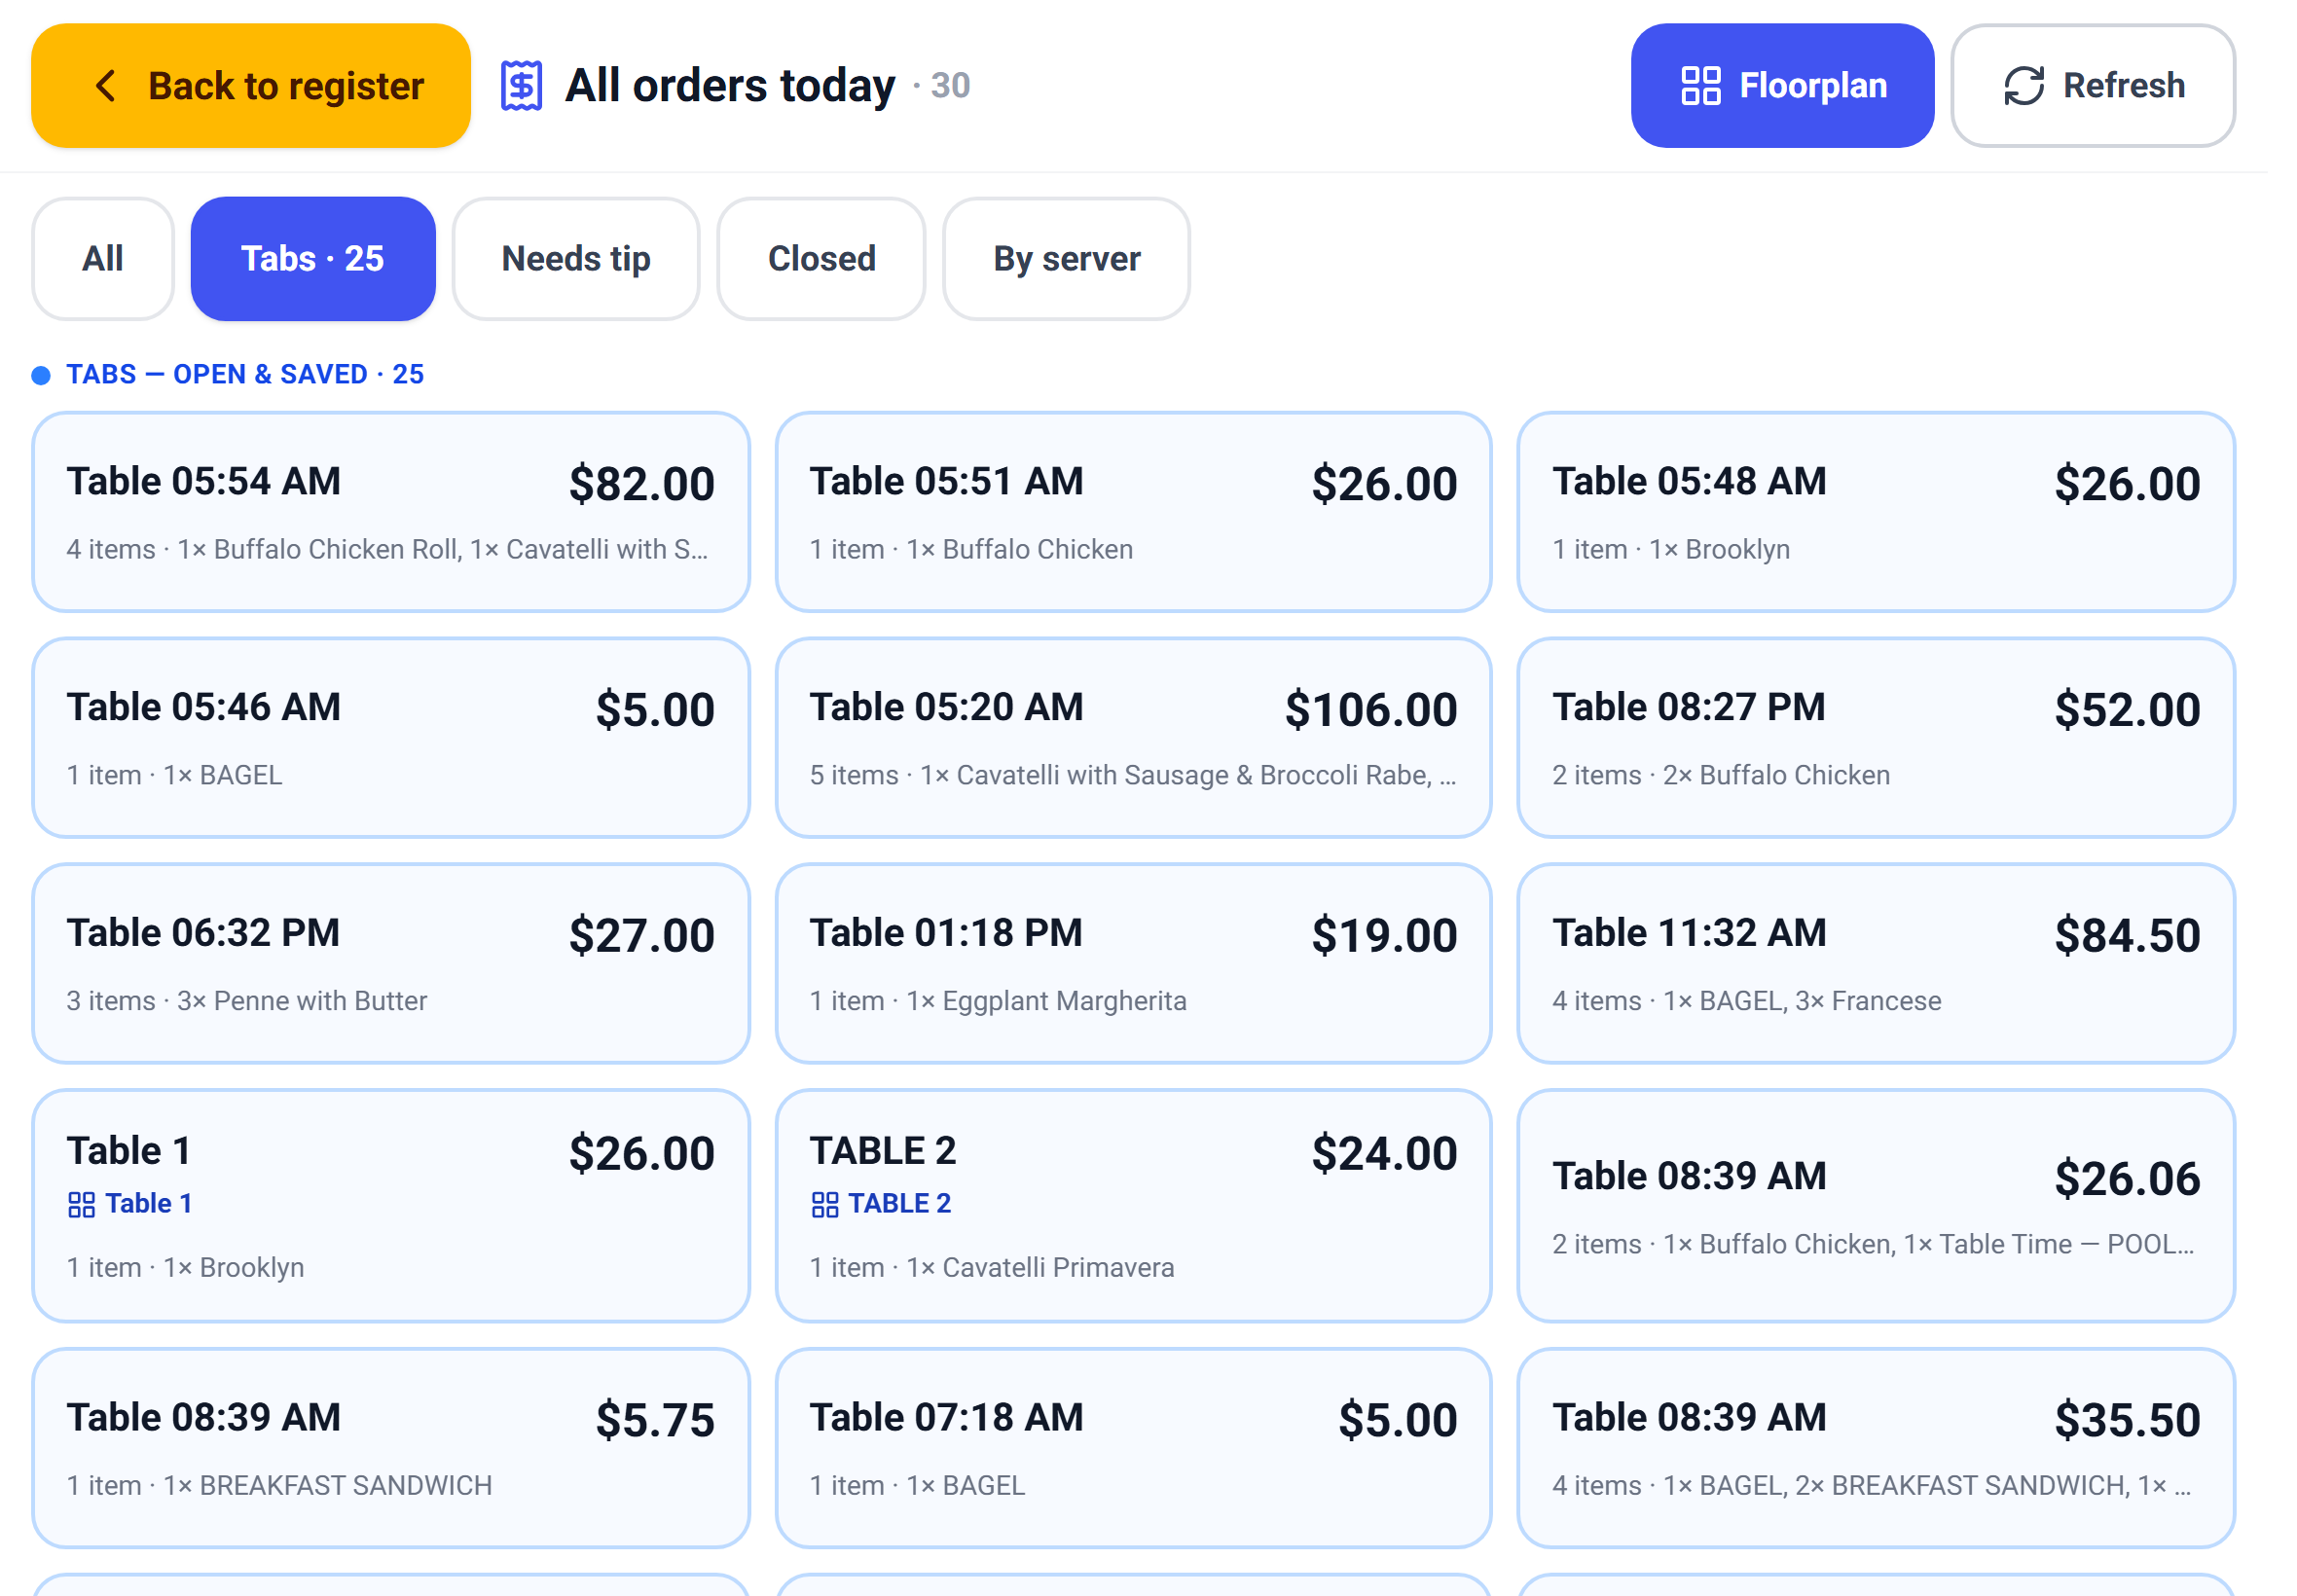
Refunds aren't done here. A closed sale is reversed through Transactions in your back office, so the money movement is recorded properly rather than being quietly erased at the counter.
The cash drawer
The Drawer button opens the drawer session panel – the counter-service tool row in QSR, the top-bar Menu in table service.
- 1Open drawer starts a session with an opening float, so the count at the end means something.
- 2Paid in records cash added mid-shift; Paid out records cash taken out – a delivery driver, a tip payout, petty cash. Each takes a reason.
- 3No sale pops the drawer without a sale attached, and records that it happened.
- 4Count the drawer to close ends the session against expected cash and stores the difference.
- 5Open drawer in the tool row is the separate, simpler thing: pop the drawer right now, no session involved.
You can require the drawer to be counted before a cashier clocks out. It's one switch in settings, and it turns "the drawer was short sometime this week" into "the drawer was short on Tuesday night".
Table Time at the register
If you rent by the hour – pool tables, lanes, karaoke rooms, bays – a Table Time button appears in the toolbar once you've set up a rate. The running timer lives at the top of the ticket it belongs to, with the cost climbing every second, and tapping it gives you Pause, Resume, Stop & add, and Remove.
The register will not let you check out with a timer still running on that ticket – it stops you and points at the timer, because closing the sale would drop the rental revenue. Timers are scoped to their own ticket, so two lanes running at once never see each other's clocks.
Full setup – rates, rounding rules, minimums – is in the Table Time chapter.
Locking, cashiers and closing out
With cashiers set up, the register locks between users and every sale is attributed. Lock in the tool row signs the current cashier out and returns to the PIN pad; on an installed tablet the red padlock in the top bar does the same. Staff clock in and out from that same lock screen if you use the time clock.
Close register lives at the bottom of the top-bar Menu. It asks for an owner or manager PIN if you've required one, and warns you if there's a sale in progress – the ticket lives in memory, so leaving would discard it.
There is one hard gate on the way out: you cannot close the register while any card sale is still waiting on a tip. The register tells you how many, and takes you to All orders instead. That is deliberate. It's the difference between a Z-report you can trust and a night spent chasing paper slips.
On a tablet, install TableTurn to the home screen and launch it from there. A register still showing browser tabs is the fastest way for someone to navigate away mid-order.
When something goes wrong
The Wi-Fi drops. An amber Offline – cash only banner appears. Cash sales keep ringing and are stored on the device; card, gift and split need a connection and grey out. When you're back online a blue Upload N offline sales button appears – tap it, or it drains on its own.
The card declines. A short rose notice names the status and the card. The ticket is untouched, so try another tender without re-ringing anything.
No terminals connected. The Terminal dropdown appears deliberately so the problem is visible instead of silent. Check the reader's power and network, then tap the refresh arrow beside it.
The session expires. Open tables and unpaid checks are held on the server, not on the tablet – sign back in and everything is where you left it.
No products in the grid. Almost always the PIN lock screen, table service opening on the floor by design, or the items themselves being hidden, variable-price, or deleted. The Troubleshooting chapter walks all three.
Manager PIN requirements
Settings → Register behavior → Require a manager PIN for… holds the granular gates, all off by default: void / clear an order, remove an item already sent to the kitchen, remove Table Time with no charge, and activate a new gift card.
Flip one on and a non-manager cashier gets the manager-PIN prompt at that moment; managers pass straight through. Discounts & tax-exempt keep their own switch, same as always.
The pattern to aim for: gate the actions that can make money disappear (voids, no-charge removals), leave the rest fast.
The Update ready pill
TableTurn ships improvements continuously, but a register that's been open for hours keeps running the version it launched with. When a newer version is live, an amber pulsing Update ready button appears in the top bar.
Tap it whenever there's a lull – the register reloads onto current code in a couple of seconds. Nothing is lost: tickets live on their tables.
If something looks stale – a fix you were told is live isn't showing – look for the pill first, or fully close and reopen the app.